Dungeons & Hackers - Level 1
Hack Fortress RE Challenge: Troll Hunter
What is Hack Fortress?
Hack Fortress is a combination of a First Person Shooter (Team Fortress2) and a jeopardy style CTF. Teams of ten are assembled with six gamers and four hackers in a single-elimination bracket. Hackers solve challenges and unlock points to buy in-game items for gamers. Each round is thirty minutes long except for the finals which run for forty-five minutes. This event has been running consistently at DEF CON and Shmoocon for almost ten years! Be sure to swing by and compete at the next conference!
Troll Hunter?
Dungeons & Hackers was the theme for the reverse engineering challenges this year’s Hack Fortress at DEF CON. The competitors were met with a text-based adventure game where they had thirty minutes to solve various challenges. To follow along with this walkthrough, grab the challenge binary from here.
What Tools Do I Need?
Everyone has their favorite suite of tools. Often for Hack Fortress a vanilla Kali Linux machine is enough for the majority of puzzles. For this walk-through, we will be leveraging radare2 (r2) for all our reverse engineering needs. For more on r2 see here. A handy cheat sheet for x86_64 assembly can also be helpful. This walkthrough is heavily focused on r2 capabilities, and multiple ways to achieve the same goal will be shown.
My Setup
I am using my Arch Linux laptop w/ r2 version 4.0. To get the latest version of r2, ensure you’re following their github installation guide. Leveraging r2 from your Linux distribution’s repos will result in an out of date binary. This may cause some small differences, but overall your reversing experience should be similar.
I’m also using a slightly modified r2 configuration file (~/.radare2rc) shown below.
e asm.cmtright = true; enable auto comments on the right
eco solarized; solarized view
e scr.utf = true; UTF-8 (makes jumps look better)
Note, the configuration syntax for r2 can change depending on the release.
When in doubt, use e <tab> within the r2 shell to autocomplete the settings.
Consider The Environment
With the understanding that Hack Fortress is a CTF with a short time limit, all of the puzzles must be challenging yet reasonable to solve. This is not lost on the judges. Each challenge sets out to test a particular skill (forensics/web hacking/etc…) from a pseudo-realistic problem set. This is how Dungeons & Hackers came to form three separate challenges each building in difficulty to test a competitor’s reverse engineering skills. For the Troll Hunter challenge, the goal was to have the competitor understanding control flow and perform a simple patch.
Get Familiar with The Challenge
Be sure to read the challenge description. All too often competitors run into the CTF without spending any time gaining context based on the challenge description. This can lead to wasting valuable CTF time. Often there’s some kind of direction or clue within the context of the directions.
What is The Binary?
Let’s go ahead and figure out more basic information about the binary. You could
run file on the binary, and understand what type of executable it is.
However, by leveraging r2 we can perform a bunch of initial triage steps with
one suite of tools. I say a suite of tools because the r2 command actually wraps
several utilities under the hood. To get started open the binary with r2.

You’ll be prompted with an r2 shell at the the entry point to the binary.
At this point, we can execute a few r2 commands and begin triaging a binary.
The i commands stand for info. After executing i, we’re presented
with a bunch of information about our binary including the architecture.
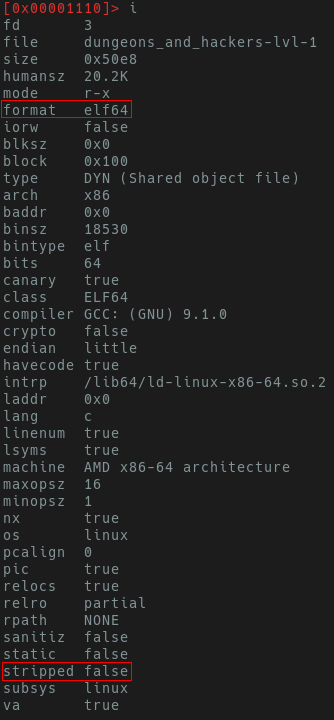
Excellent, it’s a 64-bit unstripped ELF. These symbols are going to make it easier to solve later.
Run The Binary
Be sure to run the binary and get an idea of what you’re being presented with. Are you being asked for input? Do you need to provide a file? Does a socket open? Having a basic idea of what happens when you run the binary before you open it in a disassembler will help with context later during the reversing process. Now lets run the binary!

The output suggests that the program is “rolling for us”, and badly at that. Run the binary a couple more times, and you’ll see we’re consistently getting an integer between 1 and 20. We also see key strings indicating we died. Some questions to ask ourselves:
- Can we influence what is rolled?
- Do we need to roll a all?
- Can we control a return value?
- Are there “success” strings?
Run Strings
Now that we’ve executed the binary a hand full of times and understand a bit of
the functionality, let’s run strings. However, we’re going to do so with just
r2. Within the r2 prompt execute: i?. Appending ? onto any command
at any pane in r2 will show a help menu.
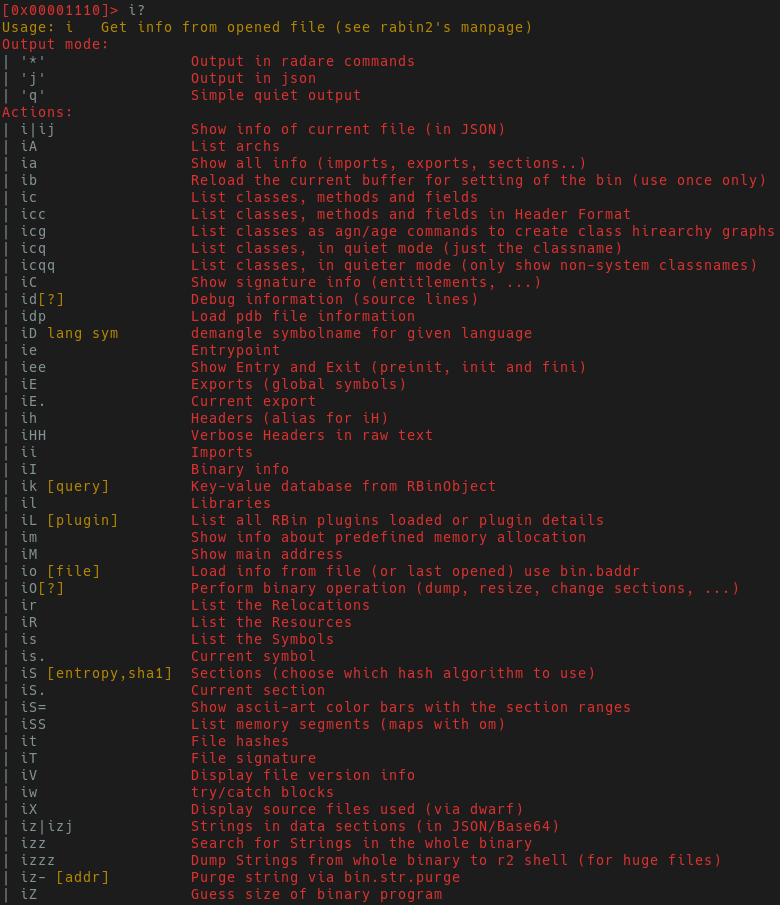
The output listing above shows all of the additional sub-commands you can leverage to further gain insight into the application. We’re interested in strings, so let us figure out which sub-command can be used for strings. Don’t bother reading all the output, just grep for it! The r2 shell allows for some traditional shell commands such as grep, awk, ls, etc.. Now we’ll have the output shown below.

Let’s start with jump dumping strings from the data section via:
iz
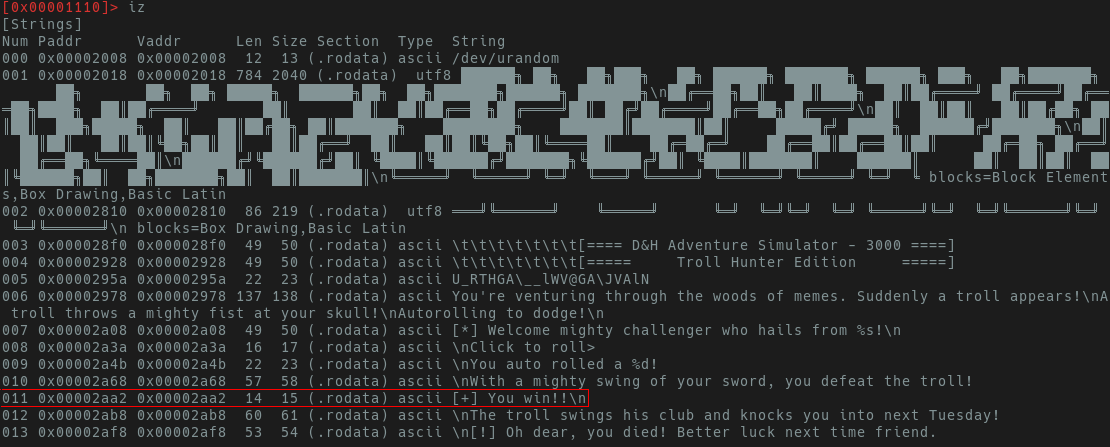
Here we see an entry of “[+] You Win!” with an offset of 0x0002aa2.
Now that we know there is indeed a win condition, let’s work backwards and
see what needs to be done to get to the win condition.
Get Familiar with The Control Flow
Analysis
The a subset of commands is used for “analysis information”. This is
how we can leverage r2 to start labeling functions and make binary navigation
easier. Just like with info, a? will show all the additional subsets of
commands that exist within the analysis functions. aaa
will go and try to label functions appropriate, identify xrefs, etc… I say
try because no tool is perfect and in your adventures with any reversing utility
you may find opportunities for pull requests and bug fixes. After we’ve run aaa
to add labels to our binary, let’s seek to to that win string.
Hexdump & Seeking
The hotkey s is for seek. s 0x2aa2 will fill in the preceding
zeros and jump us right to the “you win” string. A quick hex dump via px
(or just x) will show the text output “you win”. There are many different ways to print data
with r2. You may have guessed it p stands for print in this current mode
of r2 (p?).

Different views in r2 bind different keys to different functions. We will see
an example of this in visual mode. V and v will take us into the “visual mode”
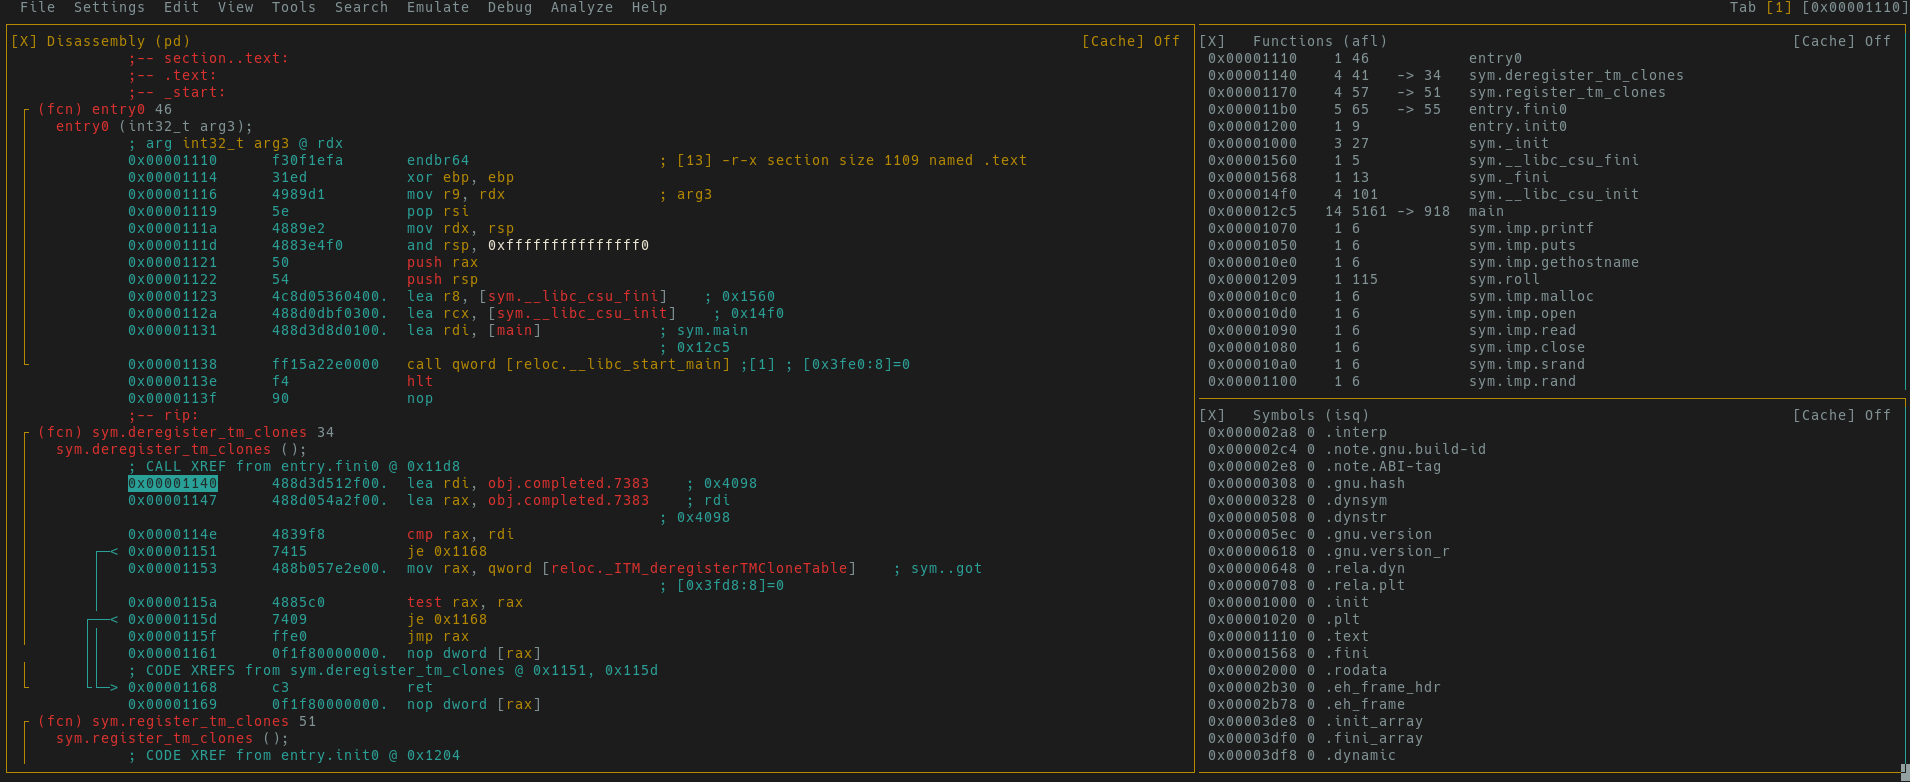
which contains several panes within r2. Press v.The first pane you’re met
with is a debugging pane with three windows containing disassembly, function
lists and symbol lists. If you were to open a binary with r2 via r2 -d $BINARY
you will be able to use this view for debugging.
XREFS & Graph View
While the previous view is great for debugging, we’re interested in finding where a
specific string lives in code. Pressing! from the debug view will take you to a hex dump pane.
The p and P keys will take you between different r2 panes. After
hitting p you will be at the linear disassembly view. Pressing x
in this context will show the cross-references (xrefs) to where this string is
called. This is seen in the image below.
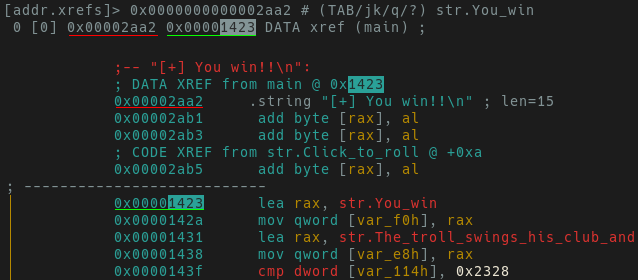
One reference of “You win” is observed where this string is called within main.
Press enter to jump to the xref. Since we know main contains the only
xref to our desired string, next time we can seek directly to main via s main.
At this point look around the disassembly and gain some context clues to what
operations make us a winner. Vim users will feel right at home, and can use jklh
to navigate.
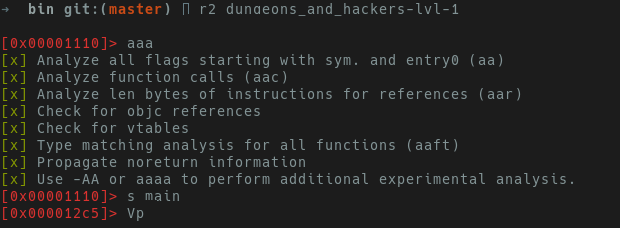
Let’s move on to the graph view. To go to the start of main enter drop back to
the r2 shell via q. Now seek to main via s main. Press V
(capital V will take you directly to the hex dump pane). Now press p
to switch to the linear disassembly pane and then space. The image below
shows the sequence of commands to run from the r2 prompt.
If you’re greeted with a screen that says “Not in a function. Type df to define it.”,
you forgot to run aaa. At this point you should be in graph mode.
You can use - to zoom out and + to zoom in on specific blocks and
gain better understanding of control flow.
The graph view image below shows two subroutines blocks branching from main.
One block has a success message and the other has a failure message.
Highlighted in green is the success message which is stored in var_f0h, and in red is the failure message stored in var_e8h.
Highlighted in purple we see a compare indicating whether or not we take a jump.
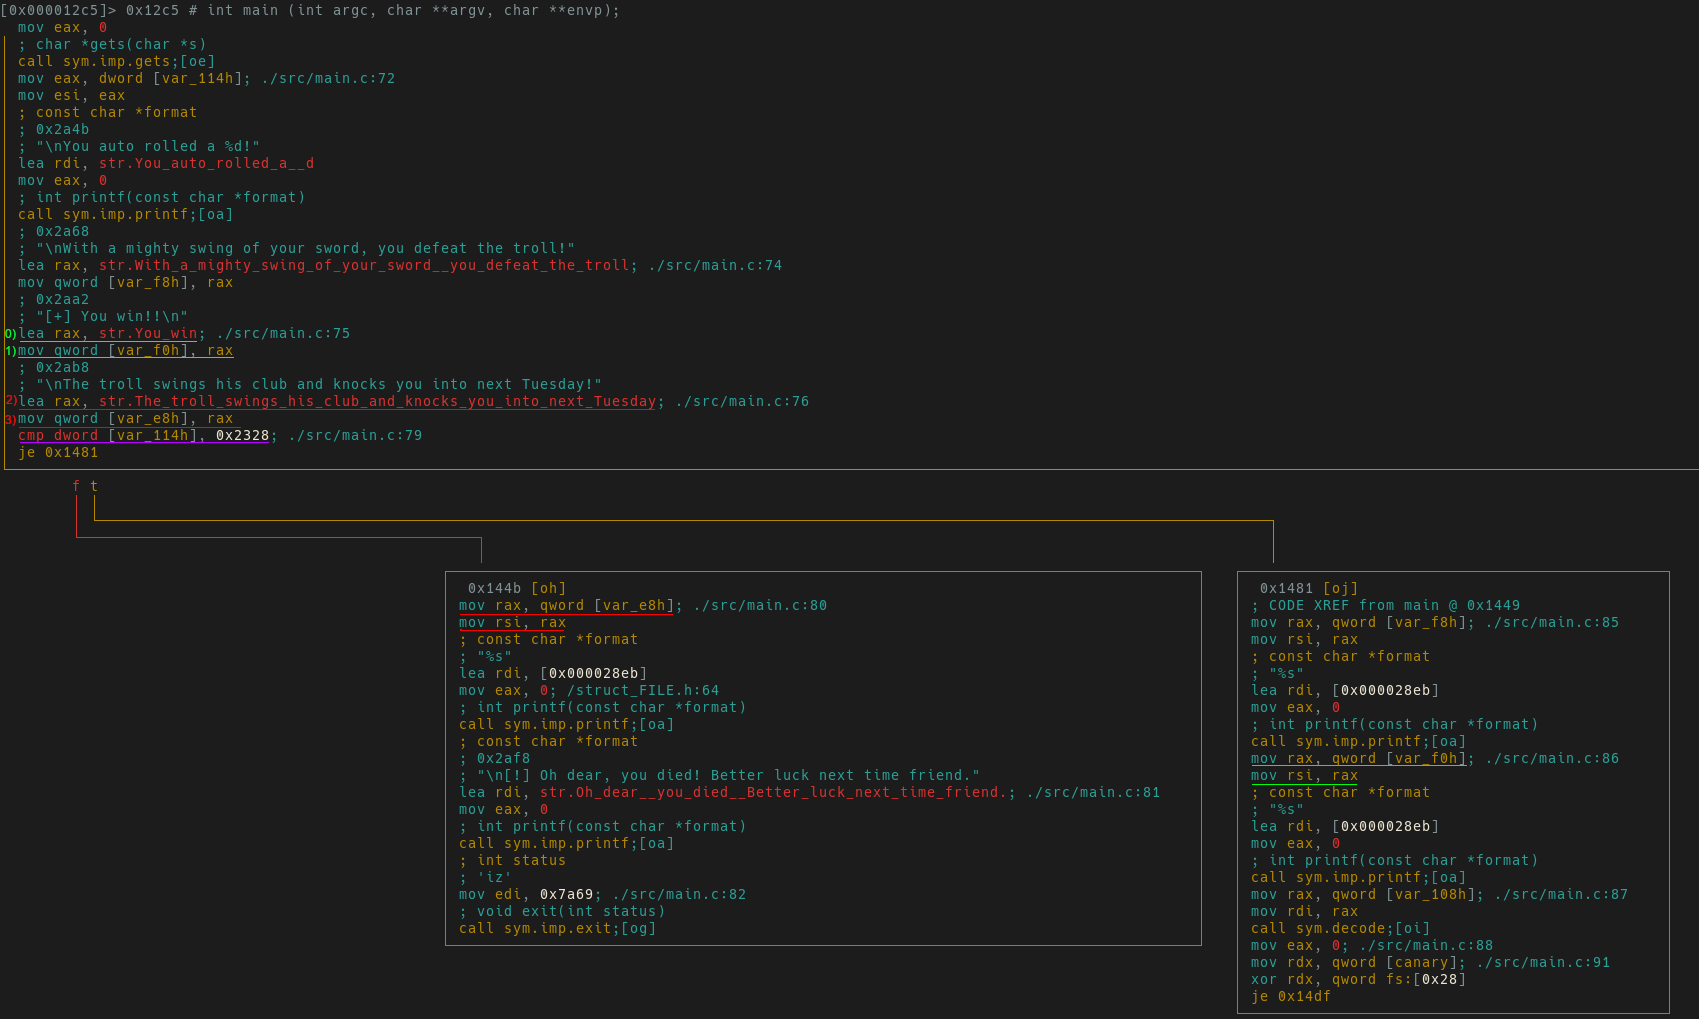
It appears if we don’t take this jump, we will continue to lose
Troll Hunter. Switch back to linear disassembly view via space for a different
perspective.
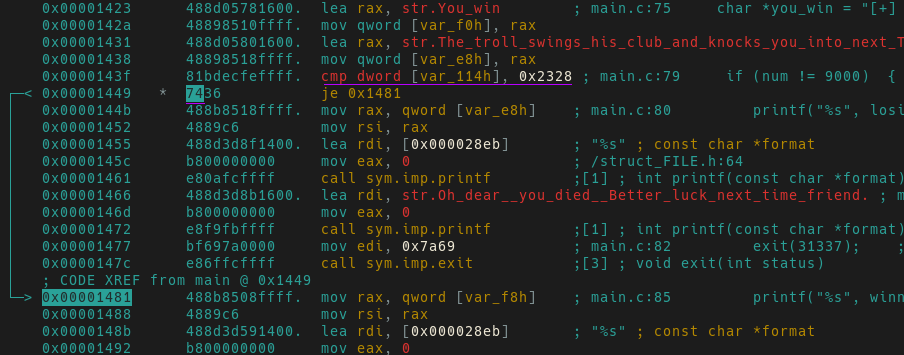
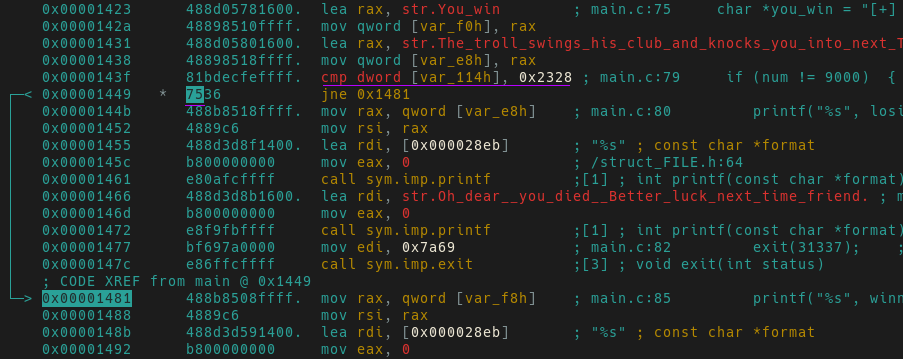
Underlined in purple we see var_114h is compared to 0x2328 (9000 in decimal). The je
(jump if equal) is taken only if var_114h equals 9000. Based on
our previous rolls, it doesn’t look like we’ll be getting this number soon. Since
we want to reach this jump condition, we need to understand how values are stored
in var_114h.
Moving further up in the disassembly we finally find what we’re looking for.
A call to roll and then the result of that (eax) is stored in var_114.

What do we do now? One could:
- Modify
roll’s return value. - Step through a debugger and manually modify
eaxprior to storing it invar_114h. - Ignore everything above the jump and change the condition to jump if not equal (
jne). - $INSERT_YOUR_CREATIVE_METHOD_HERE.
With time clicking away in our Hack Fortress competition, let’s go for the fast win and patch the jump condition.
Patching with r2
Up until now, we’ve been using r2 in read-only mode. To perform any
modifications to a binary, you must open a binary with the -w flag.
r2 -w ./dnh_lvl-1
Let’s get back to main the same way we found the initial win string. Here’s a short recap of what to run while opening the binary in write mode.
aaa; analyze & label functions, find xrefs, etc...
iz | grep 'win'; look for a win string.
s 0x2aa2; seek to string of interest.
V!; go into visual mode.
!; Hit '!' to go into linear disassembly.
x; view xref.
enter; follow xref.
I would like to note that r2 provides many ways to patch and modify binary files. Below you will see two ways. One via manually modify the opcode and another where we will just write in-line assembly.
Patch Method-1: Manually Patching Opcodes
After rediscovering the jump condition, press c to create a cursor in the
disassembly pane to be able to modify opcodes (this also works for modifying
values in the hex view). Pressing i will now put you in insert mode and allow
you to add your own hex values.
Go forth and modify opcodes for 0x7436 (je) to be 0x7536 (jne).
You will see the x64 instruction has changed to jne thus any non-9000 answer will lead us to
the flag!
Patch Method-2: In-line Assembly Patching
After rediscovering the jump condition in the linear-disassembly view you should see something similar to the screenshot below.
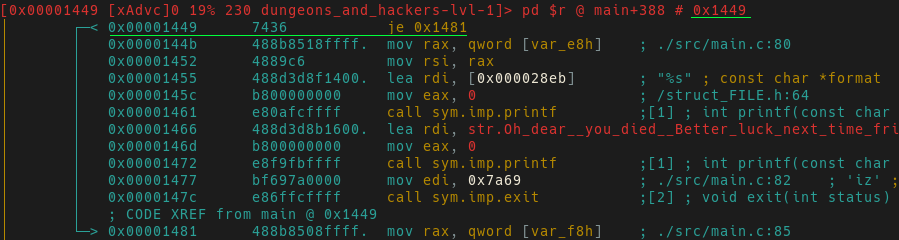
press a for the prompt to appear in the bottom left hand of your screen.

Regardless of the method you chose, the modified assembly will always jump unless
we roll a natural 9000 (which is never going to happen). Now that we’ve
modified the binary. Go ahead and quit r2 via q. All changes to the binary itself
are already made.
TADA! Re-running the application now gives us the flag, completing our first text adventure.
Beyond The Blog
Now that you’ve gotten your feet wet, go one step further and strip the binary. How about redoing the analysis in a different tool? Why not try to solve the problem in a different way? You could write your own assembly and jump right to the win section. There’s more than one way to slice a binary, and I encourage you to pick up the scalpel.