Kexec & Btrfs Subvolumes for Kernel Testing
About The Project
As a part of my Doctorate, I am re-creating prior work from academic publications in the fuzzing domain.
For kernel/embedded system fuzzing, a publication’s framework (kAFL, Nyx, Syzbot) often depends on a custom kernel, patches, etc… to get a fuzzing environment up and running. Often, these “academic GitHub repos” are a snapshot frozen in time, and recreation of a given publication is left as an exercise to the reader; a challenging and time-consuming task. While containers can help with packaging and shipping around userland components, some kernel-based fuzzing frameworks require bare metal installations in order to make use of specific processor hardware features. This blog post addresses this specific gap in my testing by leveraging btrfs subvolumes as dedicated “workspaces” and kexec, to load an arbitrary kernel necessary for a particular project.
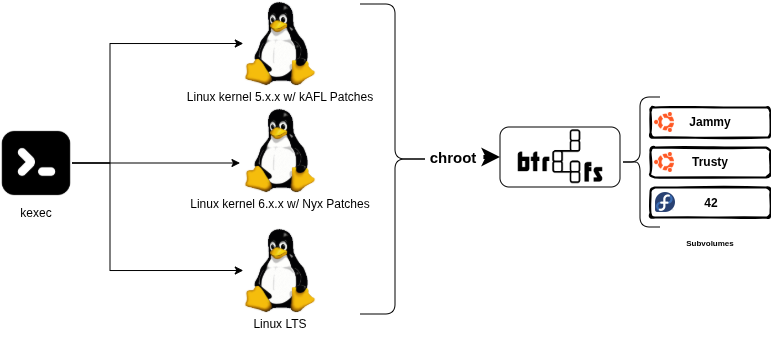
The image below shows the overall workflow.
Intel Processor Trace (PT) & Where Docker Falls Short
When discussing re-creation of complicated software tech stacks, it’s easy to point to containers and say “why not just use docker?”. After all, containers are supposed to address the “it worked on my machine” issue by packaging all necessary dependencies into a single image that can execute if the appropriate runtime is on your system.
The first challenge comes from custom kernels. As an example, kAFL, a popular kernel fuzzing framework by Intel requires a specific patched kernel. Nyx, the current backend for kAFL requires patched QEMU and a different series of kernel patches for its environment. These are two popular fuzzing frameworks, and their requirement of specific kernels, rules out containers as a viable option.
The second challenge comes from hardware-accelerated tracing, and avoiding nested virtualization.
Hardware tracing, like Intel’s Processor Trace (PT) allows for userland processes to receive trace information about a program’s execution at an incredibly fast rate. This trace data ultimately informs a fuzzer whether or not new code was reached, increasing the speed at which the overall “fuzzing loop” can be performed. Previously mentioned framework kAFL leverages hardware-accelerated tracing provided by Intel PT to rapidly gain coverage information of whether or not a specific code branch was taken.
If you’ve ever used the perf utility on Linux, this utility has the ability to make use of Intel PT under the hood. Per perf’s man page:
Intel Processor Trace (Intel PT) is an extension of Intel Architecture that collects information about software execution such as control flow, execution modes and timings and formats it into highly compressed binary packets. Technical details are documented in the Intel 64 and IA-32 Architectures Software Developer Manuals, Chapter 36 Intel Processor Trace.
At this point, you may be thinking “why not just run a VM for whatever kernel you need”? The challenge here is speed, and nested virtualization. A common metric to evaluate fuzzers is speed via number of executions of a target per second. The faster you fuzz, the faster you’ll find bugs. While it’s possible to provide hardware-accelerated tracing to a virtual machine (ex: qemu’s -cpu flag), you then have nested virtualization if you’re running in QEMU trying to spawn QEMU and ultimately this will hurt performance. In short, we’re going to want to take full advantage of hardware tracing technologies on bare-metal installs of our favorite Linux distribution, Arch Linux.
Kexec Yourself Before You Wreck Yourself (or really your OS install)
Kexec allows you to load a new kernel, and perform a “soft reboot” into said kernel without fully rebooting your host. A soft reboot ultimately will kill all running processes, but you don’t go back to the bootloader. It’s quicker to use kexec than to power off and on a given machine.
I first learned about kexec via this blog post many years ago which walks through running Arch Linux on a Steam Link. Valve’s Steam Link had a locked bootloader that required signed kernels to load. However, if your kernel supports kexec, you can ultimately load a kernel of your choosing and not have to deal with the pesky locked bootloader. The blog post linked above walks through building kexec for the kernel that ships with the Steam Link to load it, but I’m borrowing the same idea of:
-
kexecinto kernel of your choosing. -
chrootinto a userspace you’ve built.
If kexec is enabled in your kernel via CONFIG_KEXEC=y, it can be seen via kexec entries in /proc/kallsyms.
...truncated...
ffffffff8e8cdb9c T kexec_debug_exc_vectors
ffffffff8e8cde40 T kexec_va_control_page
ffffffff8e8cde48 T kexec_pa_table_page
ffffffff8e8cde50 T kexec_pa_swap_page
ffffffff8e8cde60 T kexec_debug_8250_mmio32
ffffffff8e8cde68 T kexec_debug_8250_port
ffffffff8e8cde70 t kexec_debug_gdt
ffffffff8e8cde90 t kexec_debug_gdt_end
...truncated...
If your kernel is compiled without kexec, as is the case with Steam Links, it will have to be built as a stand-alone kernel module. This is a more involved task, but there are many GitHub repos that do just this for the Steam Link.
For those who are particularly interested in Steam Link shenanigans, Valve has open-sourced pretty much everything to do with the now unsupported product at this GitHub repo. You still need to do the kexec trick to load a custom kernel, as Valve cannot contractually release the private key for kernel signing. Note the scary README text below:
WARNING: Steam Link devices will only boot with a kernel signed by Valve. If you attempt to replace the kernel with an unsigned binary you will void your warranty and render your Steam Link unbootable.
Subvolumes & Distro User-Spaces
Reading through academic publications, you’ll see a wide variety of Linux distributions used and depending on the year of publication, the releases vary quite a bit as well. Installing an end-of-life or nearly end of life distribution is not appealing. Nor is having a dedicated piece of homelab equipment setup for just a particular recreation of a given project. This is where Btrfs subvolumes come to the rescue. Btrfs is a Copy-On-Write (COW) file system that enables near instantaneous snapshotting of data. These snapshots can easily be used to restore workspaces after changes, or use as a “golden base” for a clean fuzzing workflow.
The snippet below shows a trivial example of creating, snapshotting and restoring a file.
# new subvolume created
[root@arch-dev ~]# btrfs subvolume create /test-space
Create subvolume '//test-space'

# create files and make a snapshot of the subvolume
[root@arch-dev ~]# echo 'lol' > /test-space/lol
[root@arch-dev ~]# btrfs subvolume snapshot -r /test-space test-space-snapshot
Create readonly snapshot of '/test-space' in 'test-space-snapshot'

# delete the file
[root@arch-dev ~]# cat /test-space/lol
lol
[root@arch-dev ~]# rm /test-space/lol
[root@arch-dev ~]# cat /test-space/lol
cat: /test-space/lol: No such file or directory

#Simply copy the file back
[root@arch-dev ~]# cp /root/test-space-snapshot/lol /test-space/
[root@arch-dev ~]# cat /test-space/lol
lol

# cleanup and delete all subvolumes
[root@arch-dev ~]# btrfs subvolume delete /root/test-space-snapshot/
Delete subvolume 281 (no-commit): '/root/test-space-snapshot'
Now, how is this actually useful? Leveraging debootstrap, pacstrap or dnf it’s easy to create Linux userlands that are used in these academic papers to the re-create the projects. Combining this with btrfs subvolumes, I can now snapshot experiments at different states, and easily back them up to return to them later and re-run analysis.
The snippet below shows a Ubuntu 22.04 userland living within the /jammy btrfs subvolume.
[root@arch-dev ~]# btrfs subvolume list /
.... truncated ....
ID 262 gen 78 top level 256 path jammy <----  This is /jammy for Ubuntu 22.04
ID 280 gen 147 top level 256 path test-space
.... truncated ....

# typical 22.04 Jammy in this directory
[root@arch-dev ~]# ls /jammy/
bin  boot  dev  etc  home  lib  lib64  media  mnt  opt  proc  root  run  sbin  srv  sys  tmp  usr  var

[root@arch-dev ~]# cat /jammy/etc/os-release
PRETTY_NAME="Ubuntu 22.04 LTS"
NAME="Ubuntu"
VERSION_ID="22.04"
VERSION="22.04 (Jammy Jellyfish)"
VERSION_CODENAME=jammy
ID=ubuntu
ID_LIKE=debian
HOME_URL="https://www.ubuntu.com/"
SUPPORT_URL="https://help.ubuntu.com/"
BUG_REPORT_URL="https://bugs.launchpad.net/ubuntu/"
PRIVACY_POLICY_URL="https://www.ubuntu.com/legal/terms-and-policies/privacy-policy"
UBUNTU_CODENAME=jammy
Putting It All Together, and Backing It All Up
Now to blend kexec, and btrfs subvolumes!
First, kexec will load the desired kernel. Then, after the reboot, uname -r will validate the new kernel has been loaded. Finally, chrooting into a pre-created Btrfs subvolume will give me a desired Linux userland while preserving Arch Linux on my host machine.
[root@arch-dev ~]# uname -r
6.18.38-1-lts
[root@arch-dev ~]# export KERNEL=/boot/vmlinuz-linux
[root@arch-dev ~]# export INITRD=/boot/initramfs-linux.img
[root@arch-dev ~]# kexec -l "$KERNEL" --initrd="$INITRD" --reuse-cmdline
[root@arch-dev ~]# systemctl kexec

Broadcast message from root@arch-dev on pts/1 (Wed 2026-07-08 21:28:27 EDT):

The system will reboot now!

[root@arch-dev ~]# Read from remote host 192.168.122.15: Connection reset by peer
Connection to 192.168.122.15 closed.

dllcoolj@thonkpad ~ [255]> ssh 192.168.122.15; # Logging back in!
[dllcoolj@arch-dev ~]$ uname -r
7.1.2-arch3-1               ;# <---- NEW KERNEL!!!

[dllcoolj@arch-dev ~]$ sudo su
[sudo] password for dllcoolj:

[root@arch-dev dllcoolj]# chroot /jammy/
root@arch-dev:/# uname -r
7.1.2-arch3-1

root@arch-dev:/# apt-get update -y   ;# < ---- Now we're using apt in Jammy 22.04
Hit:1 https://mirrors.rit.edu/ubuntu jammy InRelease
Get:2 https://mirrors.rit.edu/ubuntu jammy/main Translation-en [510 kB]
Fetched 510 kB in 1s (892 kB/s)
Reading package lists... Done
The snippet above shows the kexec + btrfs workflow, but the real value is the ability to save these subvolumes off with btrfs send/receive. Those familiar with ZFS, will be right at home sending and receiving snapshots to different machines with an underlying system running btrfs.
The snippet below shows creating a read-only snapshot which can then be “sent” to a stand-alone file (jammy.btrfs below) and scp’d to a NAS or stored in AWS S3 after being compressed.
[root@arch-dev ~]# btrfs subvolume snapshot -r /jammy jammy.ro_$(date -Im)
Create readonly snapshot of '/jammy' in 'jammy.ro_2026-07-08T21:40-04:00'

[root@arch-dev ~]# btrfs send -f jammy.btrfs jammy.ro_2026-07-08T21\:40-04\:00/
At subvol jammy.ro_2026-07-08T21:40-04:00/

[root@arch-dev ~]# ls -lah jammy.btrfs
-rw------- 1 root root 367M Jul  8 21:40 jammy.btrfs
Conclusion
The creation of btrfs subvolumes enables ease of creation, archiving, and restoration of directories that I ultimately treat as “workspaces” for projects. I find the use of kexec + chrooting into subvolumes a pretty handy methodology that avoids having to dedicate a physical machine in my homelab for a specific academic paper recreation task. If you’re interested in just building & testing kernels without the btrfs subvolume portion, I would recommend exploring virtme-ng.