Chatting with Chippies: Modifying TP-Link AX 1800 Firmware
About The Project
Arch Cloud Labs projects in the past have tinkered in malware analysis and reverse engineering, but a goal of mine for 2025 was to get a deeper understanding of hardware. Now that 2025 is almost over, I was able to squeeze this blog post in right before it ends. This side project ultimately modifies the Windows driver installer of the TP-Link AX 1800. This is achieved by modifying the data on the TP-Link flash chip. The blog post below walks through my process of performing a hardware tear down, and Bus Pirate hookup to perform SPI operations on said flash chip.
Beginning with An Amazon Purchase
This journey starts with an Amazon purchase.
In late 2024, I purchased the TP-Link AX 1800 Wi-Fi adapter as it was one of the most popular Wi-Fi adapters on Amazon at the time, and most importantly has Linux support! When plugging it into my Linux laptop however, no new network device appeared. Further investigation of dmesg revealed this device was a listed as a “USB Mass Storage device” made by Realtek. Given that Realtek is a semiconductor manufacturer that typically develops 802.11, and Bluetooth chipsets I was more than confused to the output of lsusb below.
[79329.575950] usb 3-1.1.2.4: new high-speed USB device number 23 using xhci_hcd
[79329.666865] usb 3-1.1.2.4: New USB device found, idVendor=0bda, idProduct=1a2b, bcdDevice= 0.00
[79329.666874] usb 3-1.1.2.4: New USB device strings: Mfr=1, Product=2, SerialNumber=0
[79329.666878] usb 3-1.1.2.4: Product: DISK
[79329.666880] usb 3-1.1.2.4: Manufacturer: Realtek
[79329.669603] usb-storage 3-1.1.2.4:1.0: USB Mass Storage device detected
[79329.669803] scsi host0: usb-storage 3-1.1.2.4:1.0
[79330.904934] usb 3-1.1.2.4: USB disconnect, device number 23
[79331.622644] usb 3-1.1.2.4: new high-speed USB device number 24 using xhci_hcd
[79331.716617] usb 3-1.1.2.4: New USB device found, idVendor=2357, idProduct=013f, bcdDevice= 0.00
[79331.716628] usb 3-1.1.2.4: New USB device strings: Mfr=1, Product=2, SerialNumber=3
[79331.716632] usb 3-1.1.2.4: Product: 802.11ac WLAN Adapter
[79331.716636] usb 3-1.1.2.4: Manufacturer: Realtek
[79331.716638] usb 3-1.1.2.4: SerialNumber: 00e04c000001
Since the TP-Link AX 1800 would not appear as a normal network device on my Linux laptop, I passed it through to a Windows VM to further investigate.
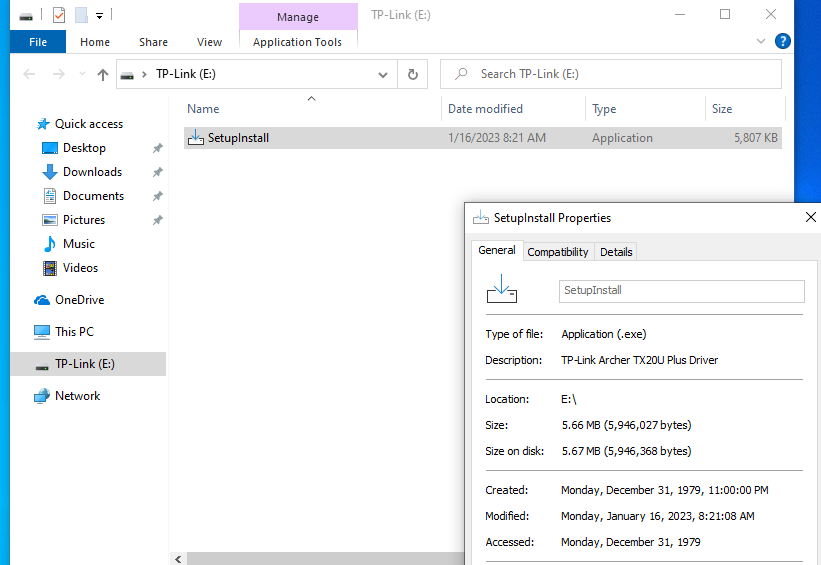
Upon passing the device to a Windows machine, a 16MB drive appeared with a file called SetupInstall.exe.
Examining the properties of this file we see the description specifies it’s a wireless driver that is 5.6MB in size.
The real fun begins when a user tries to install this driver. The User Account Control (UAC) alert below (a mechanism in Windows that prevents users from performing administrative actions) presents a warning the user this installer is not cryptographically signed.
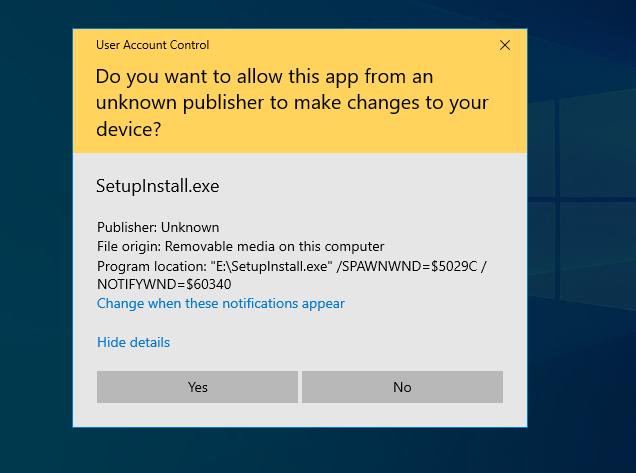
Typically, Windows drivers and often their associated installers are cryptographically signed by a vendor to verify you’re installing software they provided.
The lack of cryptographic signature on the SetupInstall.exe, is what makes it an interesting target.
If this installer was signed, an end user would be able to verify they’re installing software from a vendor.
The lack of signature presents the opportunity to modify the underlying SetupInstaller.exe image, knowing the end user will be presented with a UAC prompt with an unmodified version of the installer or a modified version. If successful in performing said modification, your own code could be executed in a privileged context.
This was the primary motivation to this project, and where the journey to modify the installer begins!
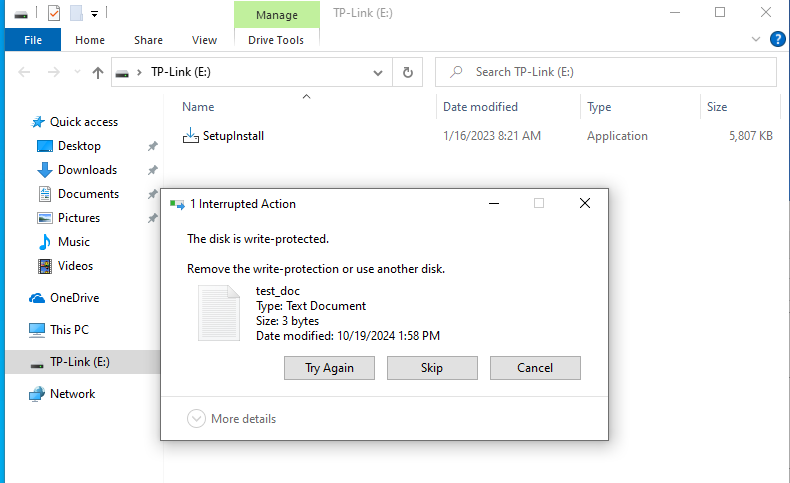
At first, I tried to simply modify the binary on the TP-Link flash storage that appeared, but quickly realized I couldn’t.
The image below shows explorer.exe alerting that the device is “write protected”. This feature could not be disabled by modify the attributes of the TP-Link(E:) drive.
At this point, I was of the opinion TP-Link had implemented some kind of write protection on the flash storage the driver is on rather than cryptographically sign it to prevent any kind tampering with the installer. The assumption that one could not modify the firmware on the flash chip without extensive effort, thus why sign the installer? If this is true, I assume with the device only being ~$30.00 and TP-Link deeming it not necessary to go through the formal “signing process” that I would have assumed other drivers in their suite of products are subjected to. To go further, I disassembled the TP-Link AX 1800 and began the hardware teardown process!
Hardware Teardown
The image below shows the board of the TP-Link AX1800. The two massive solder globs hold two wires that act as antennas. In the middle of the PCB is the Realtek wireless chipset, and finally, an 8-pin surface mount flash chip on the right.
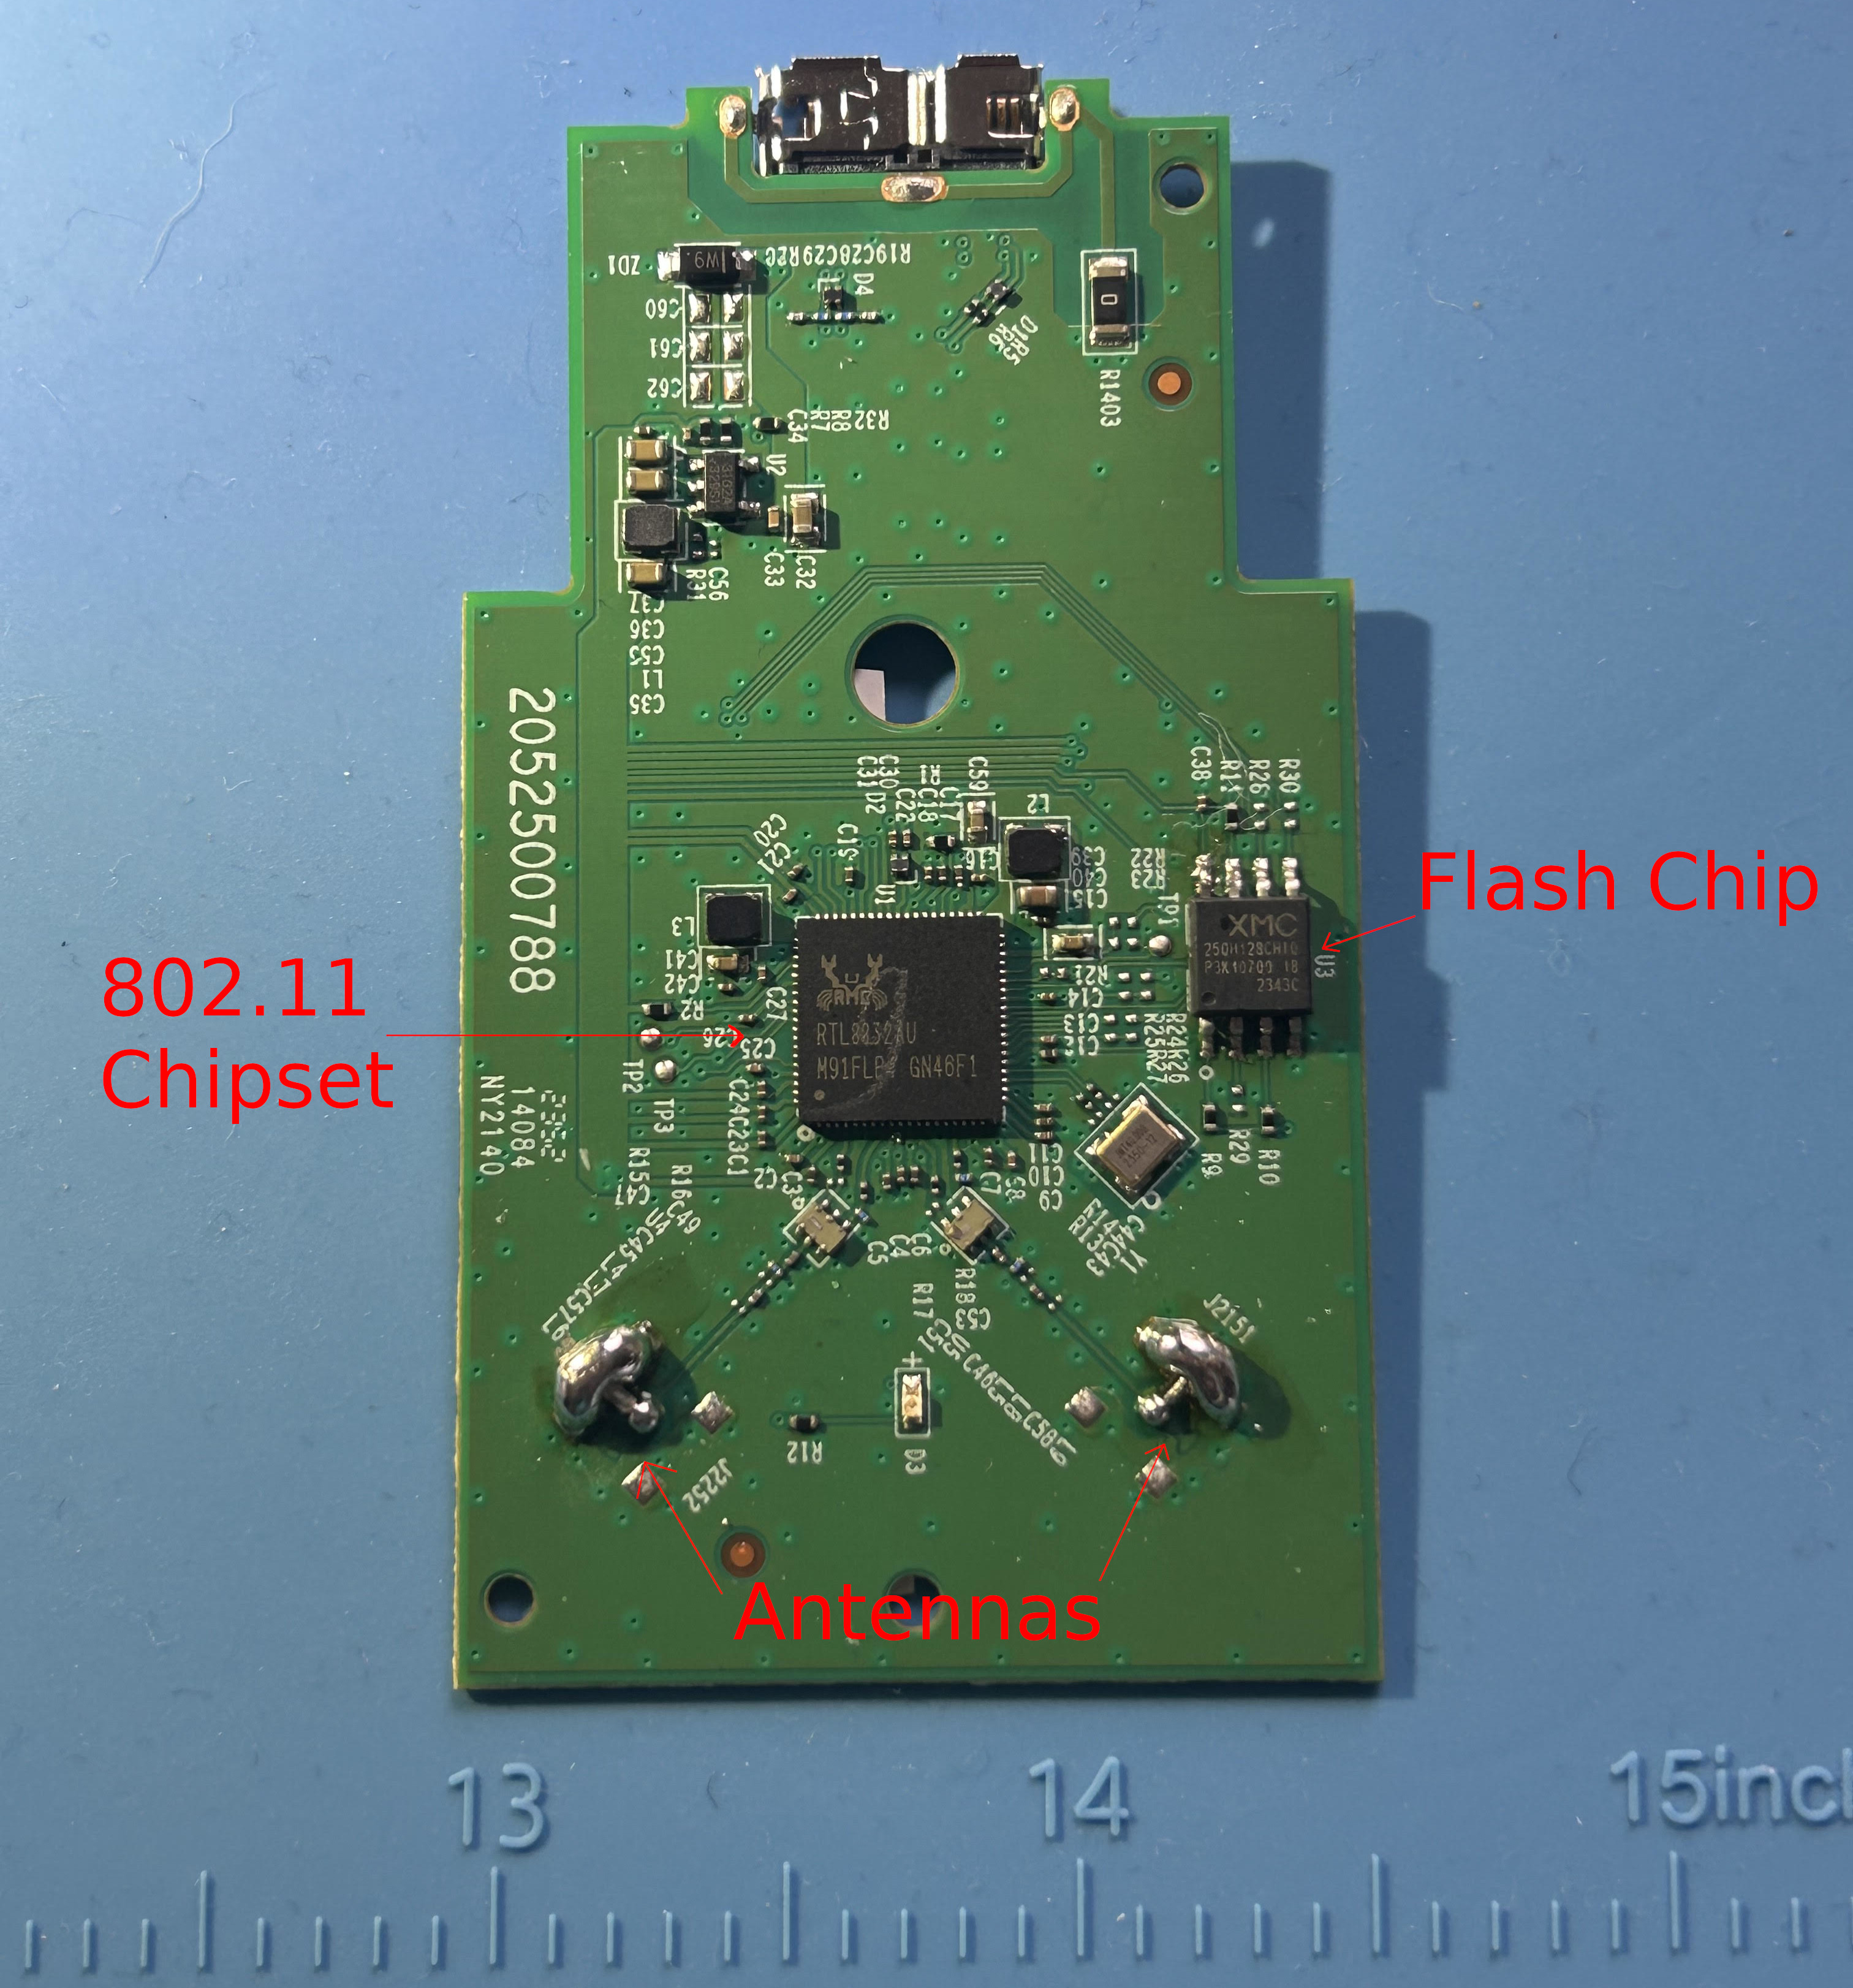
The “XM25QH128C” flash chip is an inexpensive flash chip that has a publicly available datasheet. The datasheet outlines features of this chipset to include “write protection”, confirming the theory that this device had hardware level protections from being written to. Additionally, the data sheet provided the following critical items:
- The pinout of the flash chip.
- The expected voltage of the chip.
- Details on the write protection implementation
- Command bytes to perform reads/writes/erases/etc…
The write protection (WP) section specifies that the WP pin protects against status bytes from being written to if the WP pin is in a low state.

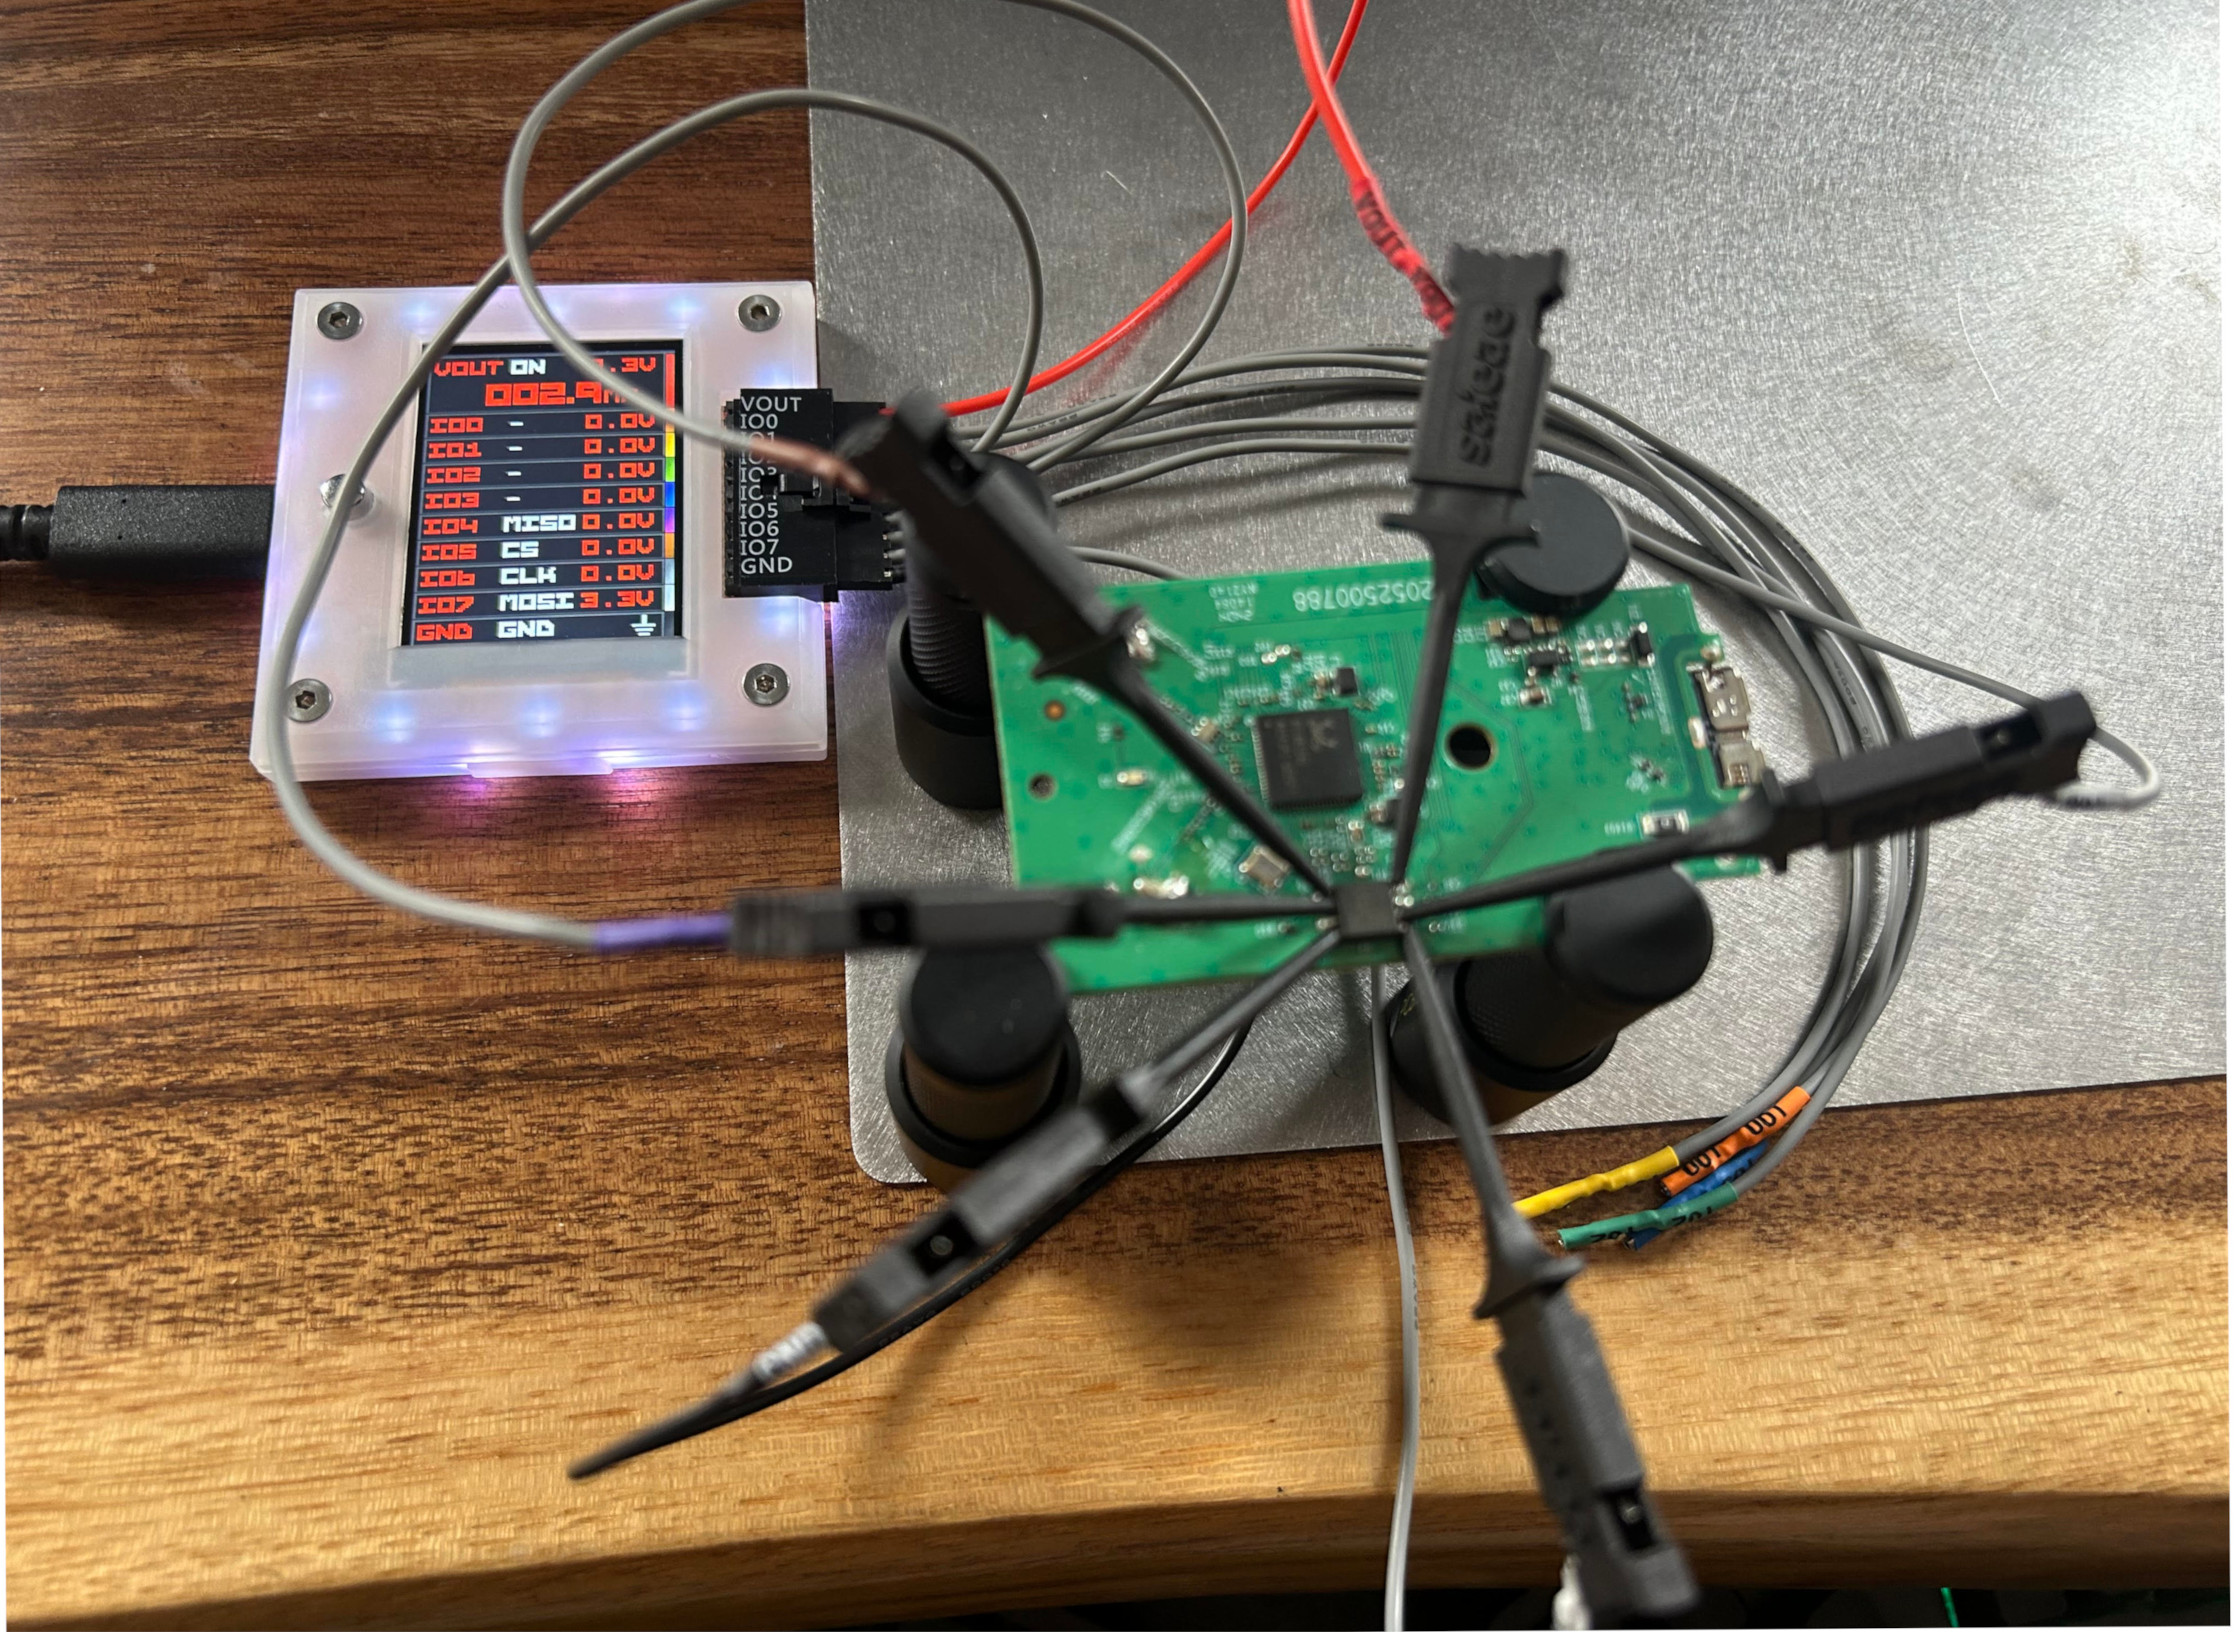
To validate whether or not this is enabled, I hooked up a logic analyzer to the flash chip and powered on the adapter. The image below shows the WP pin is held high, therefore we do not need to ground to this pin to remove the write protect functionality.

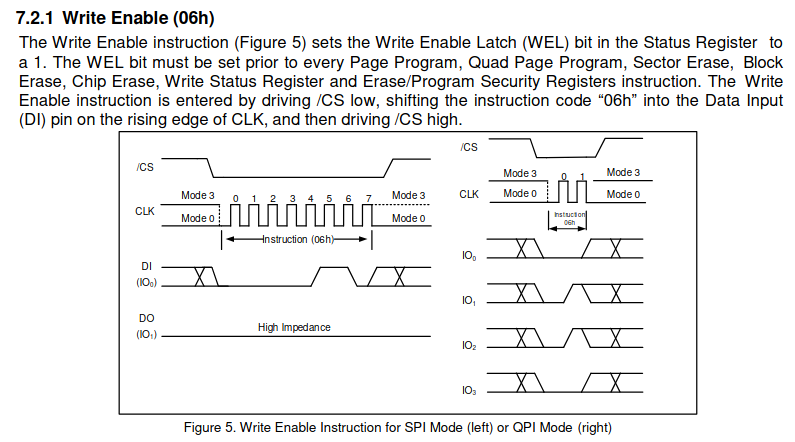
The datasheet also includes a section about a “write enable” status bit which would ultimately enable the ability to write to flash. This tracks with the inability to copy files to the drive in Windows Explorer earlier. Unless this status bit is set, we cannot modify portions of the flash. However, the Bus Pirate does support the ability to perform full flash reads and full flash writes which will be discussed later in the post.
Now for the question of how does one connect to the flash chip to interact with it? Or simply “how do we chat with the chippies?”. This is where the Bus Pirate comes into play. The Bus Pirate is an “all-in-one hardware hacker” tool that can communicate with different hardware peripherals using protocols such as I2C, SPI, and JTAG. With the flash’s pinout diagram obtained from the datasheet, it was trivial to hookup the Bus Pirate. The image below shows the Bus Pirate hooked up to the TP-Link board, but I was having issues effectively communicating to the SPI flash.
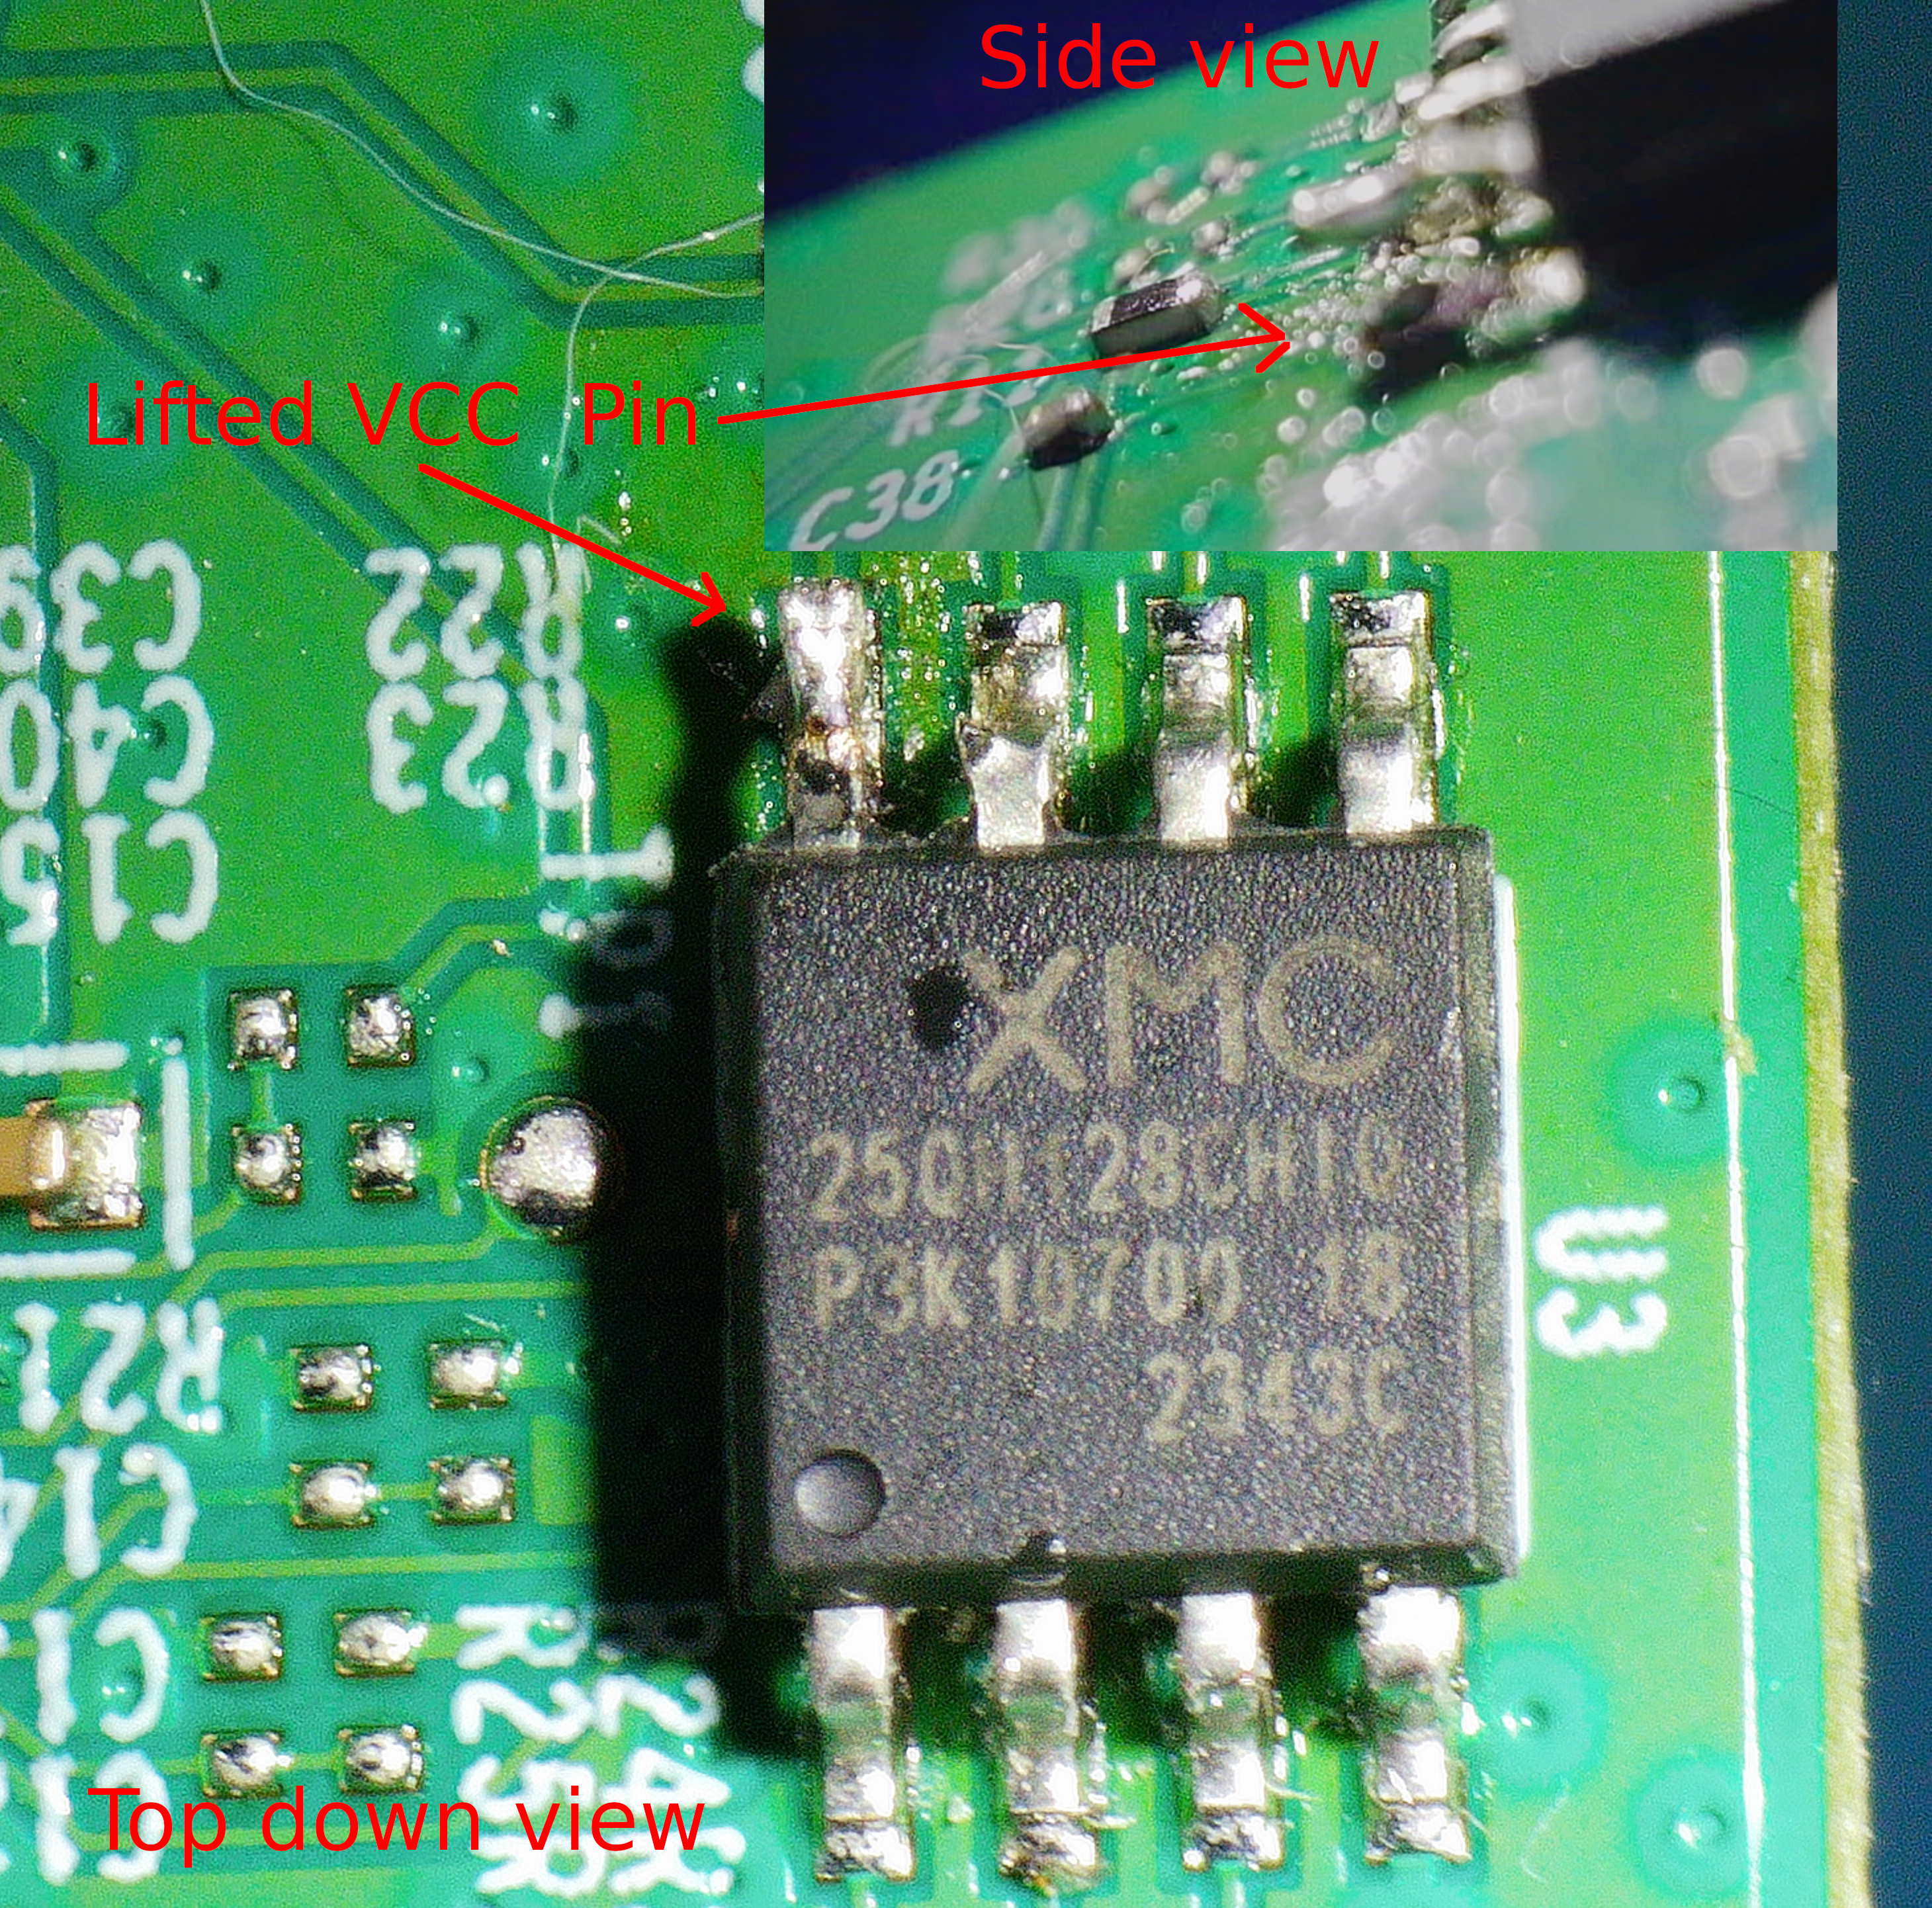
This is where co-author of this article “LEDD”, an Electrical Engineer by trade, explained to me the concept of “back powering”. When I provided power to the SPI flash from the Bus Pirate, the power continued to flow to the rest circuit board. This drew too much power from the Bus Pirate, which resulted in unreliable communication to the SPI Flash. To combat this issue one can either cut the power trace going to the SPI Flash or lift the “foot” of the SPI flash. While both options are repairable, I chose to lift a foot to practice my soldering rework skills with the hope of using the device as normal in the future. The image below shows the VCC pin lifted on the flash chip.
With the VCC pin lifted from the circuit board, and the Bus pirate connected, it is now possible to execute arbitrary SPI commands against the device. The Bus Pirate contains a few handy flash commands that would probe the device to ensure it could communicate to it first. The output below shows successfully obtaining data from the TP-Link AX1800 flash chip. With the connection successfully obtained, it’s now time to image the flash chip to modify the underlying driver.
Reading & Writing SPI w/ Bus Pirate
With the Bus Pirate hooked up successfully, we can execute a flash probe command to verify communication is ocurring as expected.
Initializing SPI flash...
Flash device manufacturer ID 0x20, type ID 0x40, capacity ID 0x18
SFDP V1.6, 2 parameter headers
                Type            Ver.    Length  Address
Table 0         JEDEC (0x00)    1.6     64B     0x000030
JEDEC basic flash parameter table info:
MSB-LSB  3    2    1    0
[0001] 0xFF 0xF1 0x20 0xE5
[0002] 0x07 0xFF 0xFF 0xFF
[0003] 0x6B 0x08 0xEB 0x44
[0004] 0xBB 0x42 0x3B 0x08
[0005] 0xFF 0xFF 0xFF 0xFE
[0006] 0xFF 0x00 0xFF 0xFF
[0007] 0xEB 0x40 0xFF 0xFF
[0008] 0x52 0x0F 0x20 0x0C
[0009] 0xFF 0x00 0xD8 0x10
4 KB Erase is supported throughout the device (instruction 0x20)
Write granularity is 64 bytes or larger
Flash status register is non-volatile
3-Byte only addressing
Capacity is 16777216 Bytes        <--- the same size we saw in Windows Explorer

Flash device supports 4KB block erase (instruction 0x20)
Flash device supports 32KB block erase (instruction 0x52)
Flash device supports 64KB block erase (instruction 0xD8)
Found a Micron  flash chip (16777216 bytes)
Now, flash read can be executed to store the contents of the flash chip on the Bus Pirate for offline analysis.
This takes us to one of the largest limitations of the Bus Pirate, which is speed.
Reading a 16MB flash chip was taking roughly 30 minutes, but for ~$50 you can’t really complain about all the features this device has.
Additionally, the Bus Pirate has limited on board storage. If you’re reading large flash chips, the utility flashrom can be used to read SPI flash to the disk of your host machine, and leverage the Bus Pirate as a SPI programmer.
After copying the binary off the flash storage and opening the binary blob in a hex editor, magic bytes could be identified for different file types.
The MZ magic bytes of a Windows Executable were identified at offset 0x54000 via binwalk, and were carved out of the binary via the following command dd if=dump.img of=test.exe skip=344064 bs=1 count=5946027. The count in bytes was taken from the file size in the first screenshot shown in this blog post.
Further down in the PE header, meta-data containing the name of the wireless adapter exists which can also be seen by hovering over the file in Windows explorer. If you’re re-creating this as your own analysis, be sure to first identify the location of the PE header and then modify the skip parameter as necessary. There’s a chance different firmware versions exist on these devices, thus the offsets may be different for your device.
0x004d7250  5400 5000 2d00 4c00 6900 6e00 6b00 2000  T.P.-.L.i.n.k. .
0x004d7260  4300 6f00 7200 7000 6f00 7200 6100 7400  C.o.r.p.o.r.a.t.
0x004d7270  6900 6f00 6e00 2000 4c00 6900 6d00 6900  i.o.n. .L.i.m.i.
0x004d7280  7400 6500 6400 2000 2000 2000 2000 2000  t.e.d. . . . . .
0x004d7290  2000 2000 2000 2000 2000 2000 2000 2000   . . . . . . . .
0x004d72a0  2000 2000 2000 2000 2000 2000 2000 2000   . . . . . . . .
0x004d72b0  2000 2000 2000 2000 2000 2000 2000 2000   . . . . . . . .
0x004d72c0  2000 2000 2000 2000 0000 0000 a200 3d00   . . . .......=.
0x004d72d0  0100 4600 6900 6c00 6500 4400 6500 7300  ..F.i.l.e.D.e.s.
0x004d72e0  6300 7200 6900 7000 7400 6900 6f00 6e00  c.r.i.p.t.i.o.n.
0x004d72f0  0000 0000 5400 5000 2d00 4c00 6900 6e00  ....T.P.-.L.i.n.
0x004d7300  6b00 2000 4100 7200 6300 6800 6500 7200  k. .A.r.c.h.e.r.
0x004d7310  2000 5400 5800 3200 3000 5500 2000 5000   .T.X.2.0.U. .P.
0x004d7320  6c00 7500 7300 2000 4400 7200 6900 7600  l.u.s. .D.r.i.v.
0x004d7330  6500 7200 2000 2000 2000 2000 2000 2000  e.r. . . . . . .
0x004d7340  2000 2000 2000 2000 2000 2000 2000 2000   . . . . . . . .
For proof of concept purposes this blog post will patch the “company name” field in the executable name to say “TP-Hack” vs “TP-Link”.
This will demonstrate successfully patching the SetupInstaller.exe binary.
Now to write data back to the flash chip, we must consult the data sheet. The data sheet will specify the commands necessary to send to the SPI flash to then perform read/write operations. The Bus Pirate allows for the ability to send arbitrary SPI commands to the flash chip.
Consulting the datasheet for performing a read, the following is provided to us.
The Read Data instruction allows one or more data bytes to be sequentially read from the memory. The instruction is initiated by driving the /CS pin low and then shifting the instruction code “03h” followed by a 24-bit address (A23-A0) into the DI pin.
For the BUS Pirate, this is achieved via putting SPI commands in between brackets.
The command below shows us reading (0x03) N number of bytes (r:N) at address 0x11e650.
[0x03 0x11 0xE6 0x50 r:N]

0011e650: 5400 5000 2d00 4c00 6900 6e00 6b00 2000  T.P.-.L.i.n.k. .
0011e660: 4300 6f00 7200 7000 6f00 7200 6100 7400  C.o.r.p.o.r.a.t.
0011e670: 6900 6f00 6e00 2000 4c00 6900 6d00 6900  i.o.n. .L.i.m.i.
0011e680: 7400 6500 6400 2000 2000 2000 2000 2000  t.e.d. . . . . .
0011e690: 2000 2000 2000 2000 2000 2000 2000 2000   . . . . . . . .
0011e6a0: 2000 2000 2000 2000 2000 2000 2000 2000   . . . . . . . .
0011e6b0: 2000 2000 2000 2000 2000 2000 2000 2000   . . . . . . . .
A comprehensive overview of the Bus Pirate commands can be found here.
Now the same logic can be applied to perform a write to a specific portion of the flash.
However, you typically need to overwrite a minimum number of bytes at a time.
For the XM25QH128C chip it’s 4k, but this is completely dependent on a given flash chip.
Alternatively, you can read the entire flash, modify it on your host machine, and then write the modified image to the target SPI flash. This is what I ended up doing.
After successfully soldering the VCC pin back to the board, and plugging the TP-Link back into the Windows VM, The SetupInstaller.exe can be seen below with the modified “Company Name”. This demonstrates successfully defeating the rudimentary hardware protection on the TP-Link AX-1800.

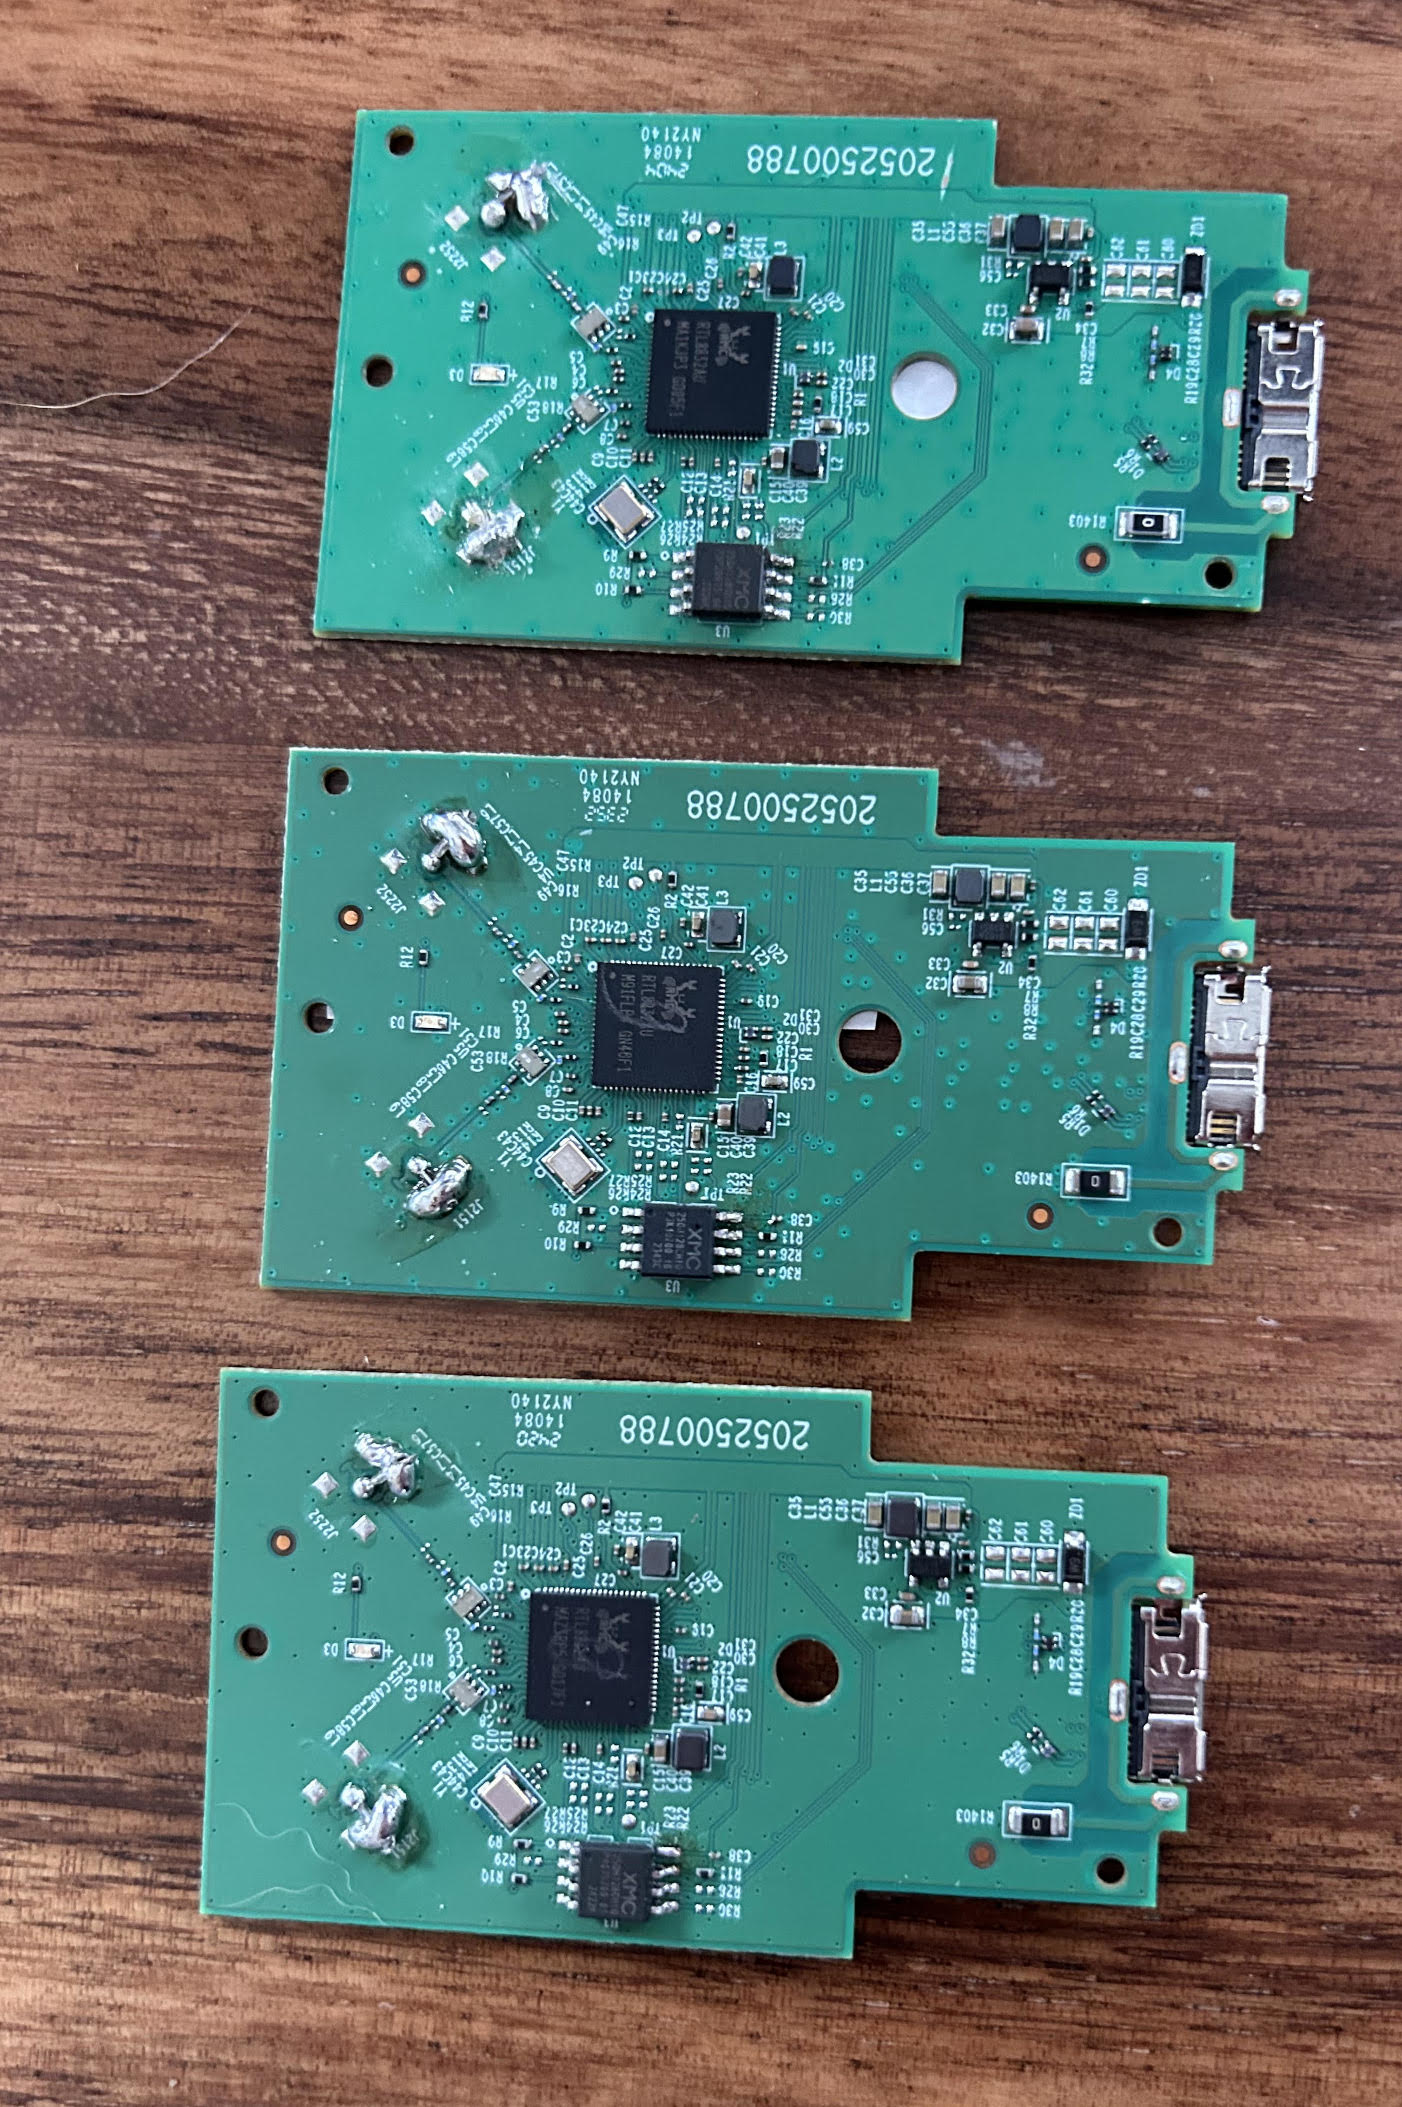
If you’ve reached this point in the article you may be wondering why does it say “Habk” and not “Hack”? I copied-and-pasted the wrong bytes prior to re-flashing the firmware image. After breaking two boards due to applying too much pressure on the VCC leg, I was nervous I’d break another so I stuck with this spelling mistake. The graveyard of broken devices can be seen below.
Beyond The Project
The TP-Link adapter is an inexpensive adapter that is an ideal candidate for tinkering with a Bus Pirate. The stars really aligned with the unsigned installer, making it a perfect hardware reverse engineering candidate. However, there’s probably equally as good if not better candidates around your house as well. If you made it this far, I hope you’re inspired to pickup a Bus Pirate and some IoT device that’s laying around your house for your own reverse engineering adventure.
Thank you for reading!